
How to Set Up VS Code for DSA and CP (C++ Users)
TL;DR
Setting up VS Code for C++ competitive programming involves: installing VS Code + MinGW (that you already knew), creating a workspace with .cpp, input.txt, and output.txt files, installing C++ extensions, configuring build tasks, and using Ctrl+Shift+B to compile and run code with automatic input/output redirection.
Setting up your environment efficiently is crucial for fast problem-solving in Data Structures & Algorithms (DSA) and Competitive Programming (CP). Here's a concise, step-by-step guide to get you started with Visual Studio Code (VS Code) for C++ programming.
1. Set Up Your Workspace
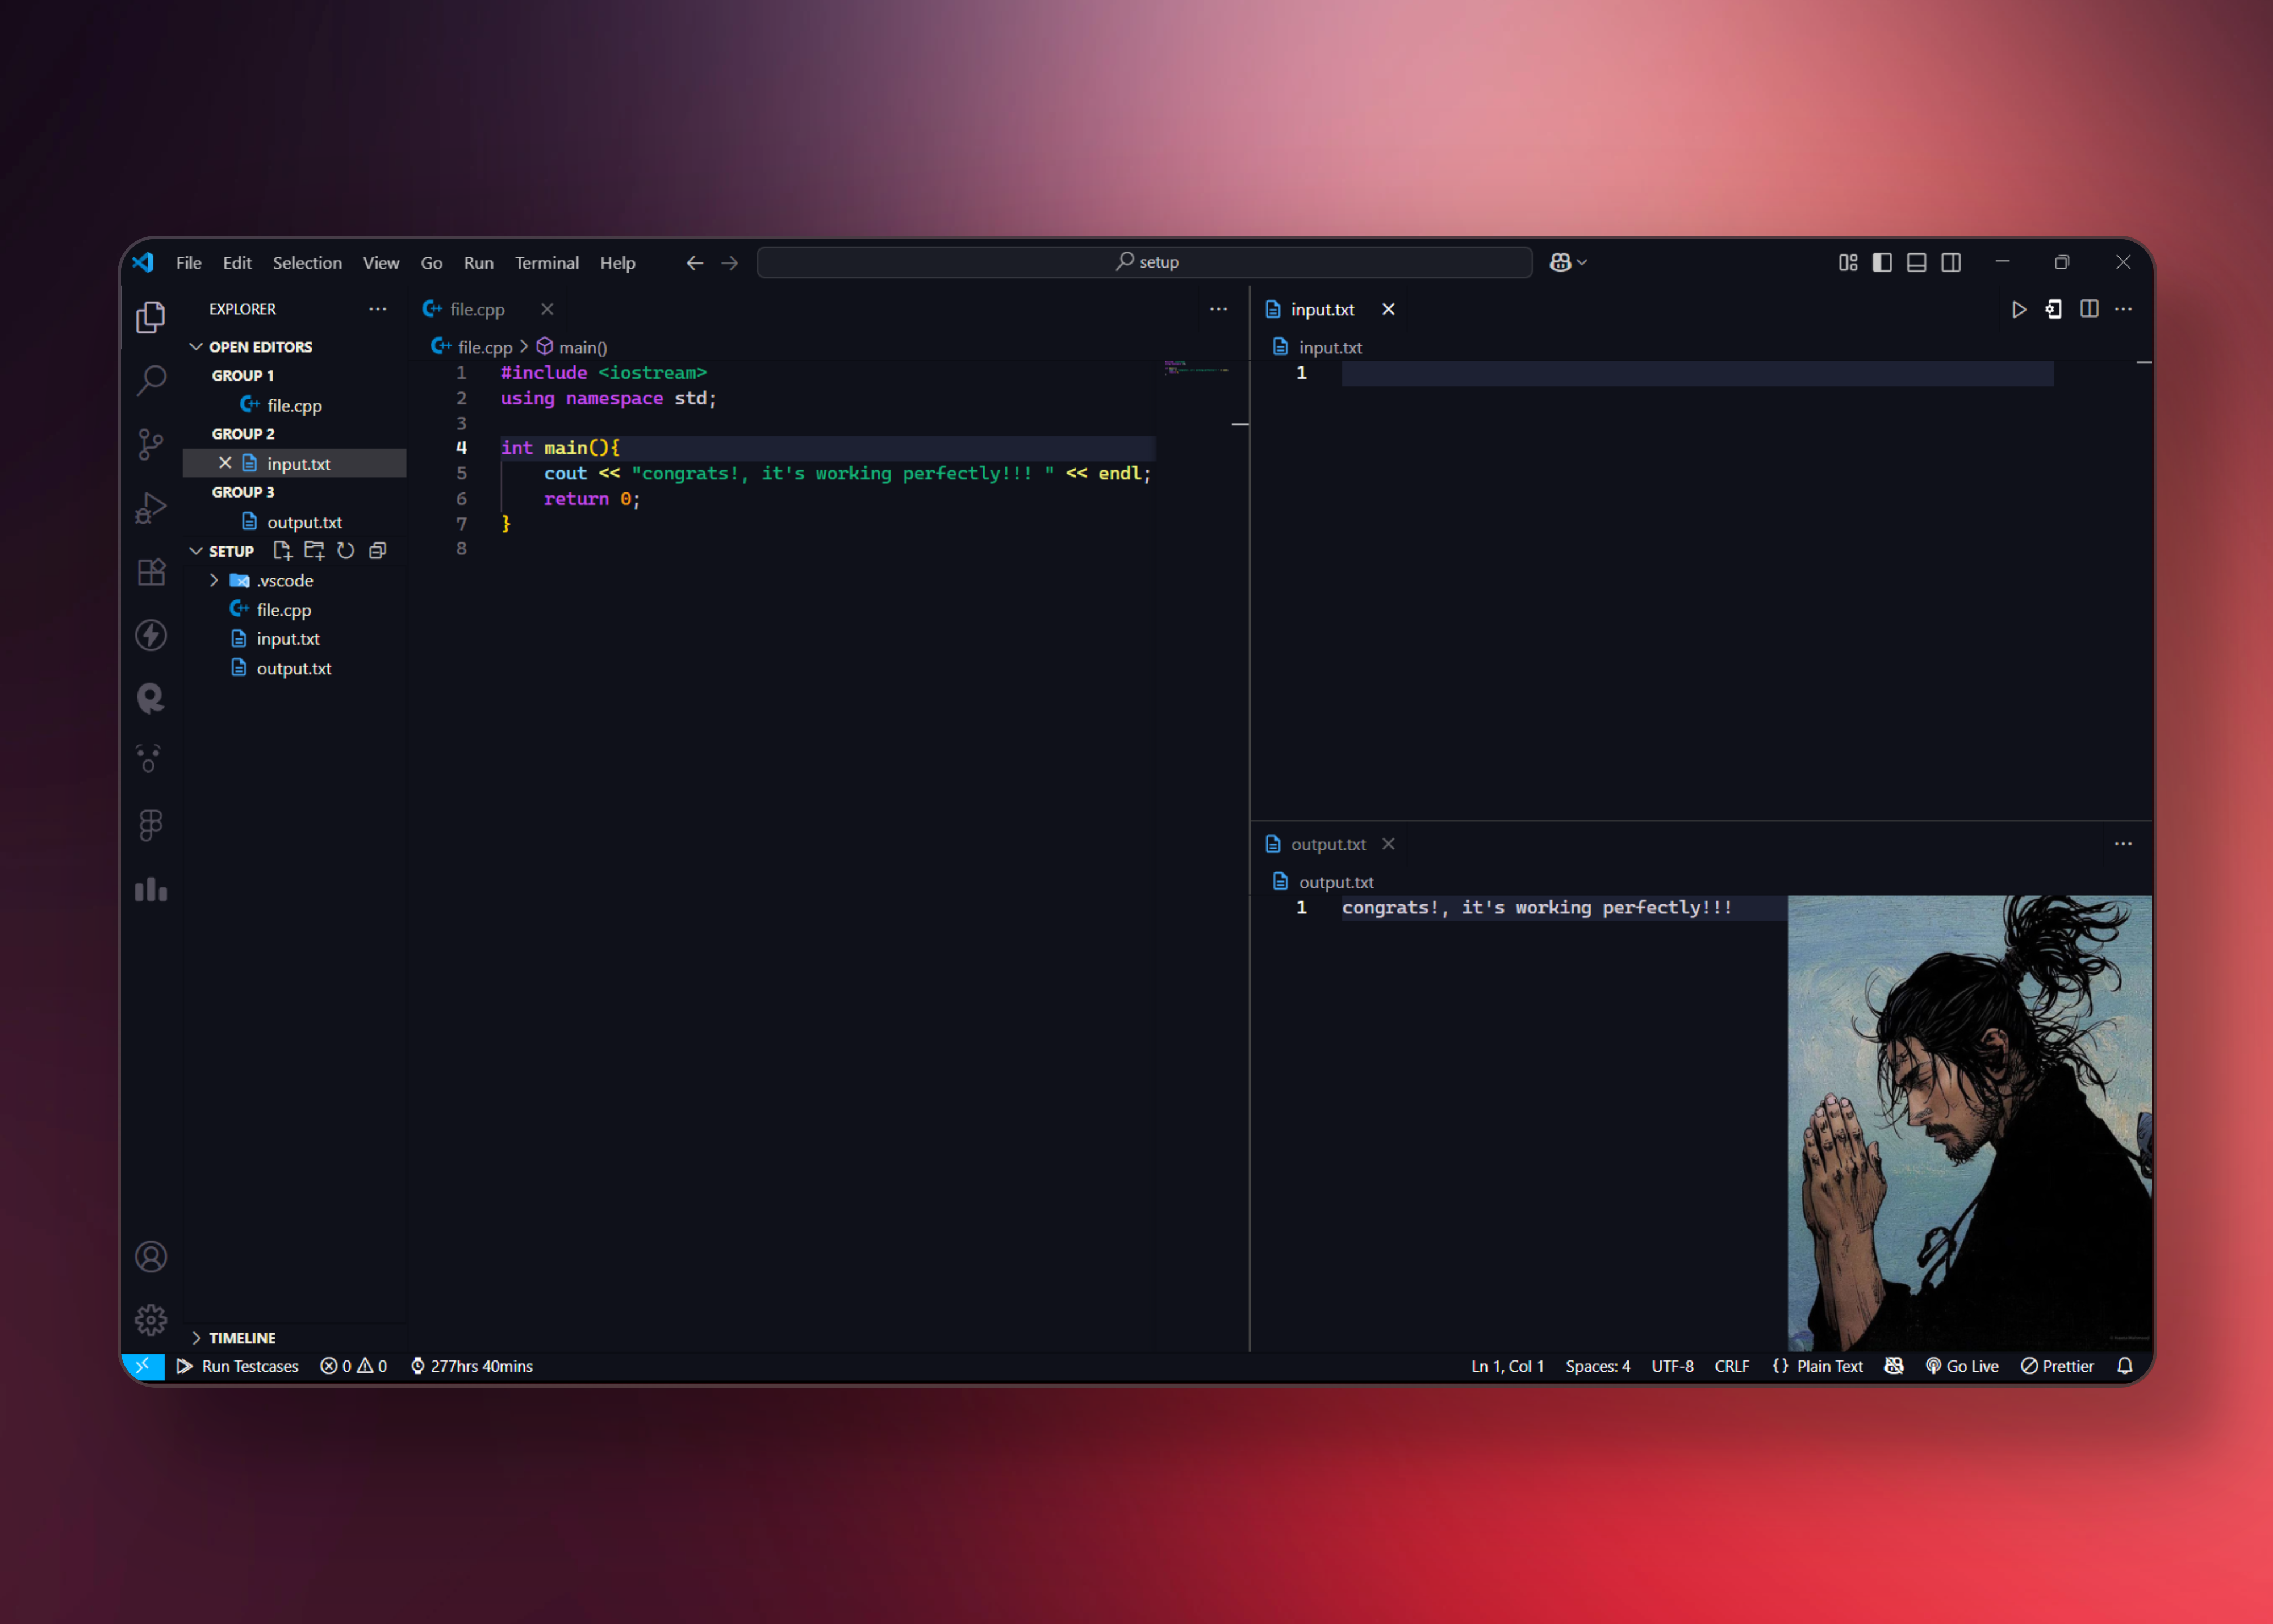
If you're aiming to set up a configuration similar to the one below, these instructions will guide you through configuring it on your workstation.
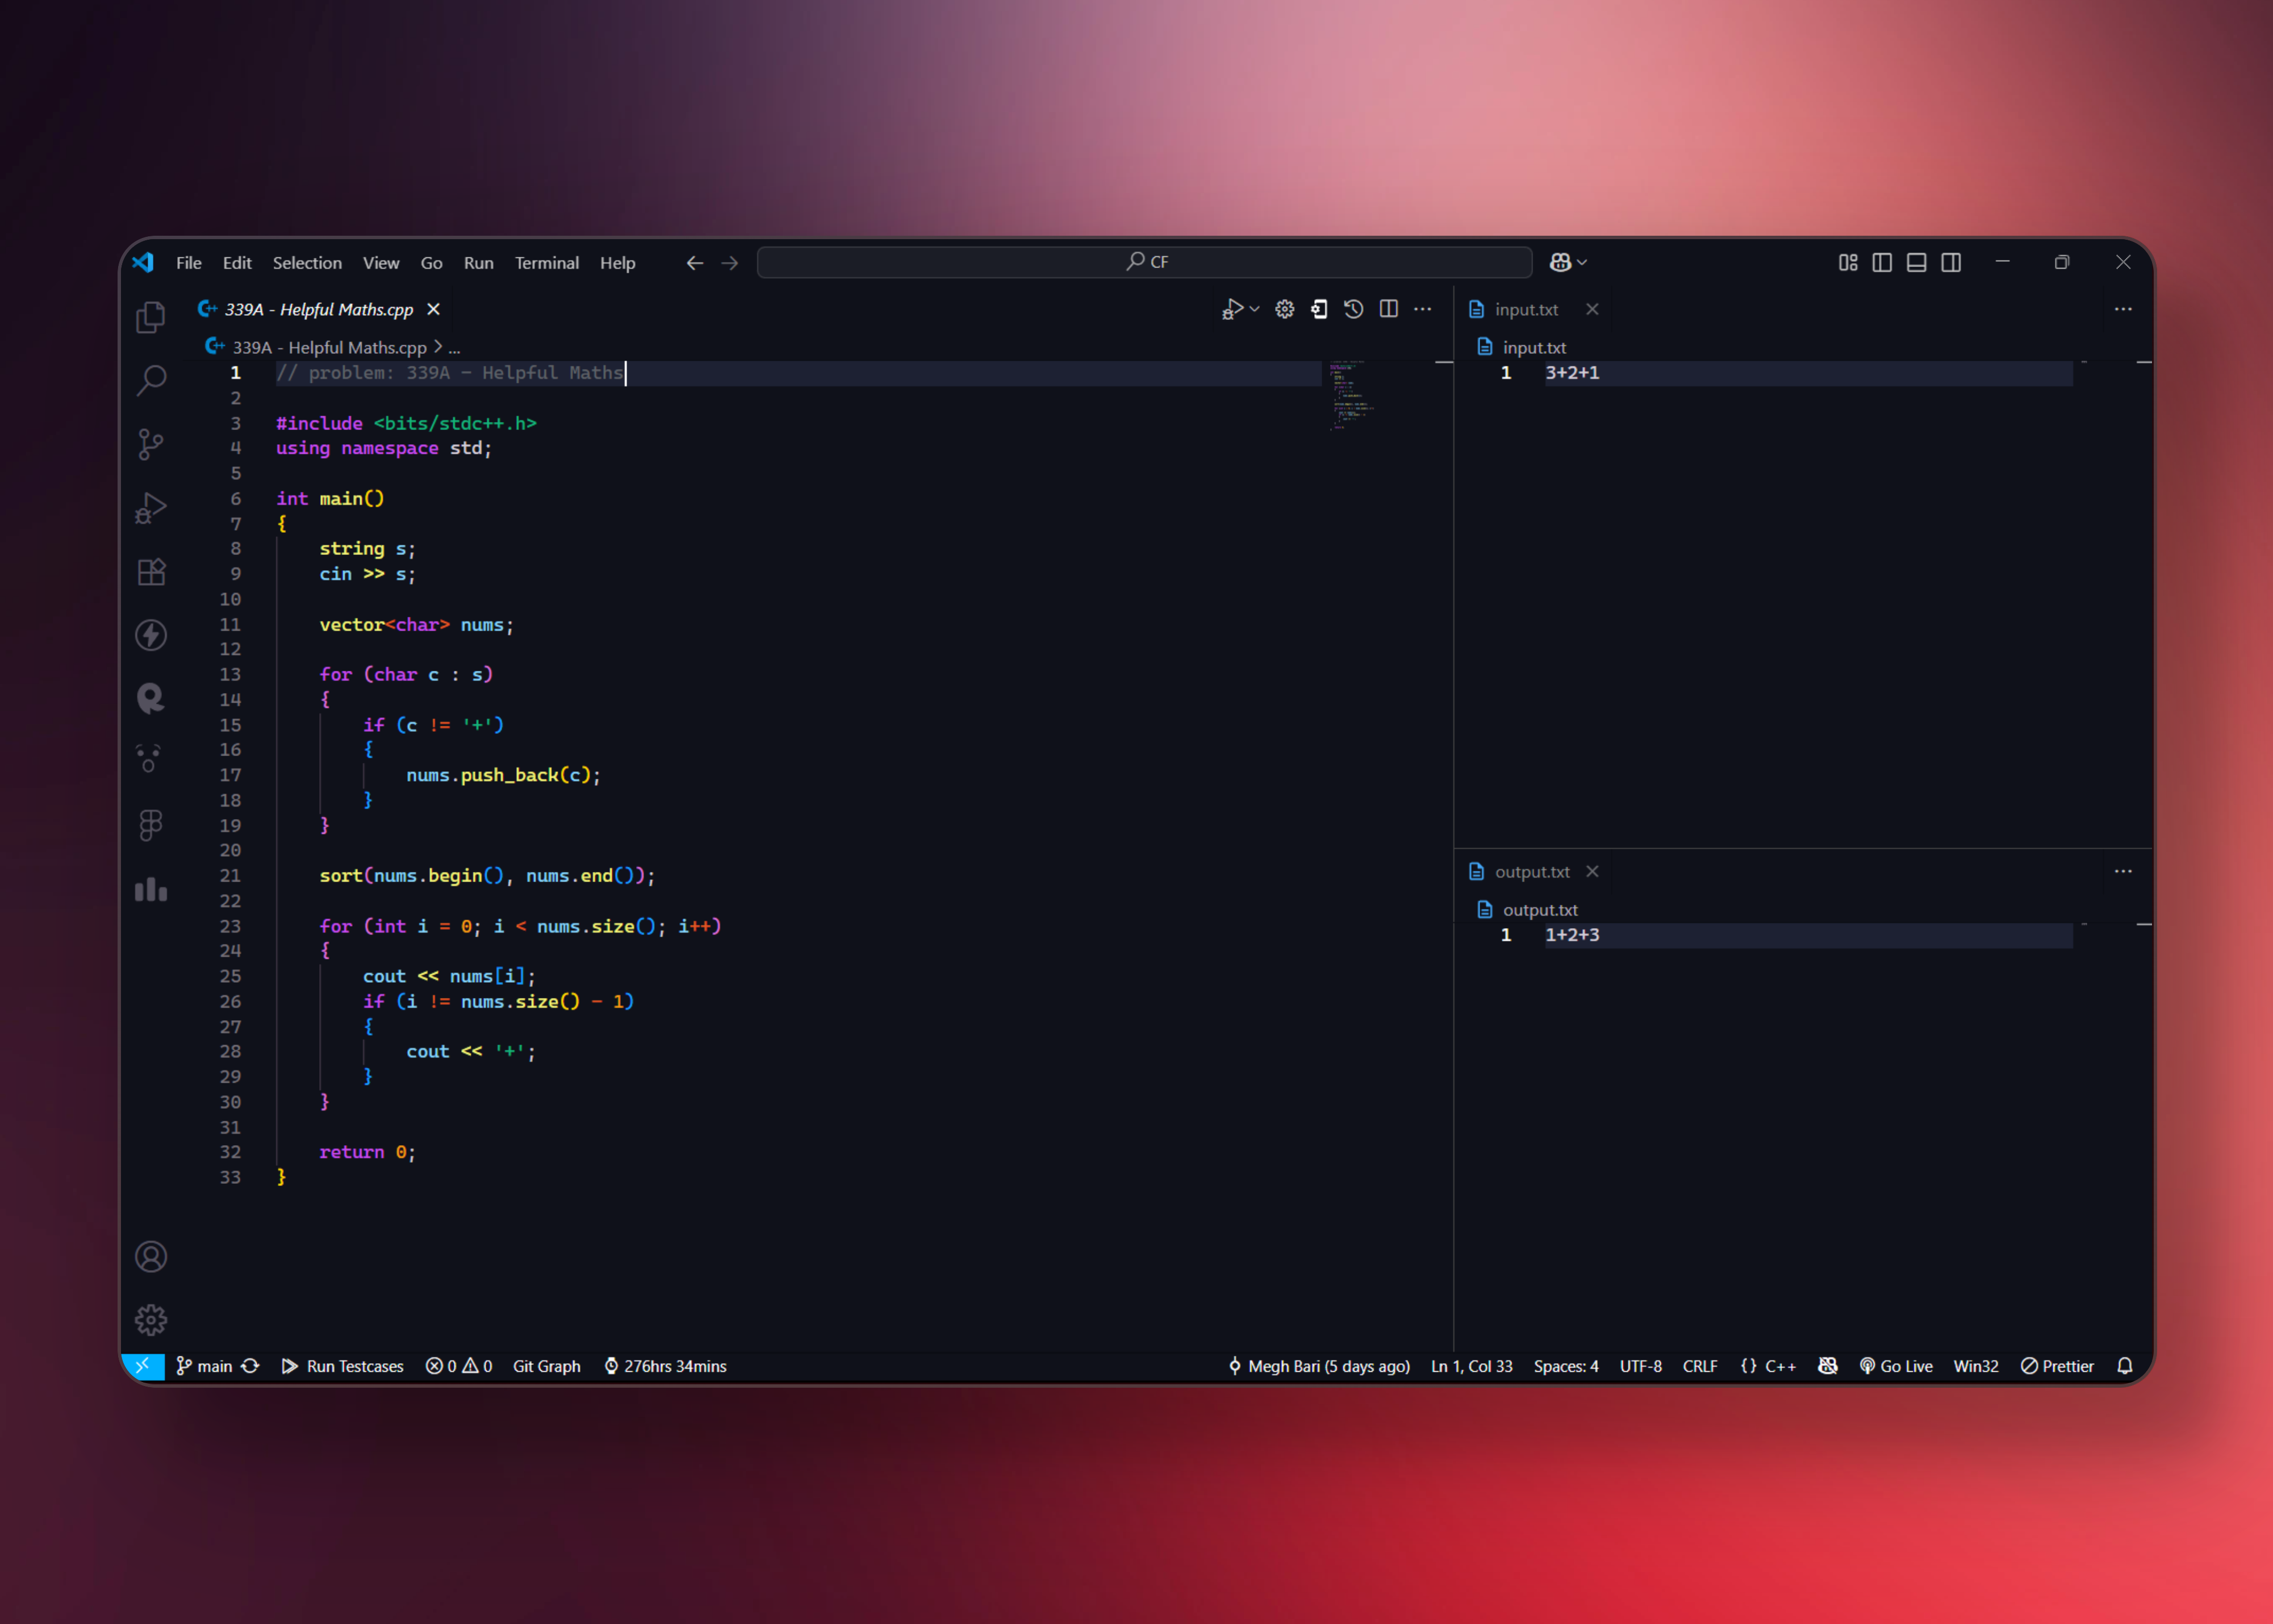
Organization is key for efficient competitive programming. Create a dedicated workspace that allows for quick problem-solving.
Create a dedicated folder for your DSA/CP files. Inside your folder, create:
- A
.cppfile (your C++ code) - An
input.txtfile (for custom inputs) - An
output.txtfile (to capture outputs)
This structure allows you to quickly test your solutions with custom inputs and see outputs without cluttering your terminal.
2. Install Extensions
Extensions enhance VS Code's functionality for C++ development.
- Open VS Code
- Go to the Extensions tab (
Ctrl+Shift+X) - Install the "C/C++ and C/C++ Extension Pack" by Microsoft
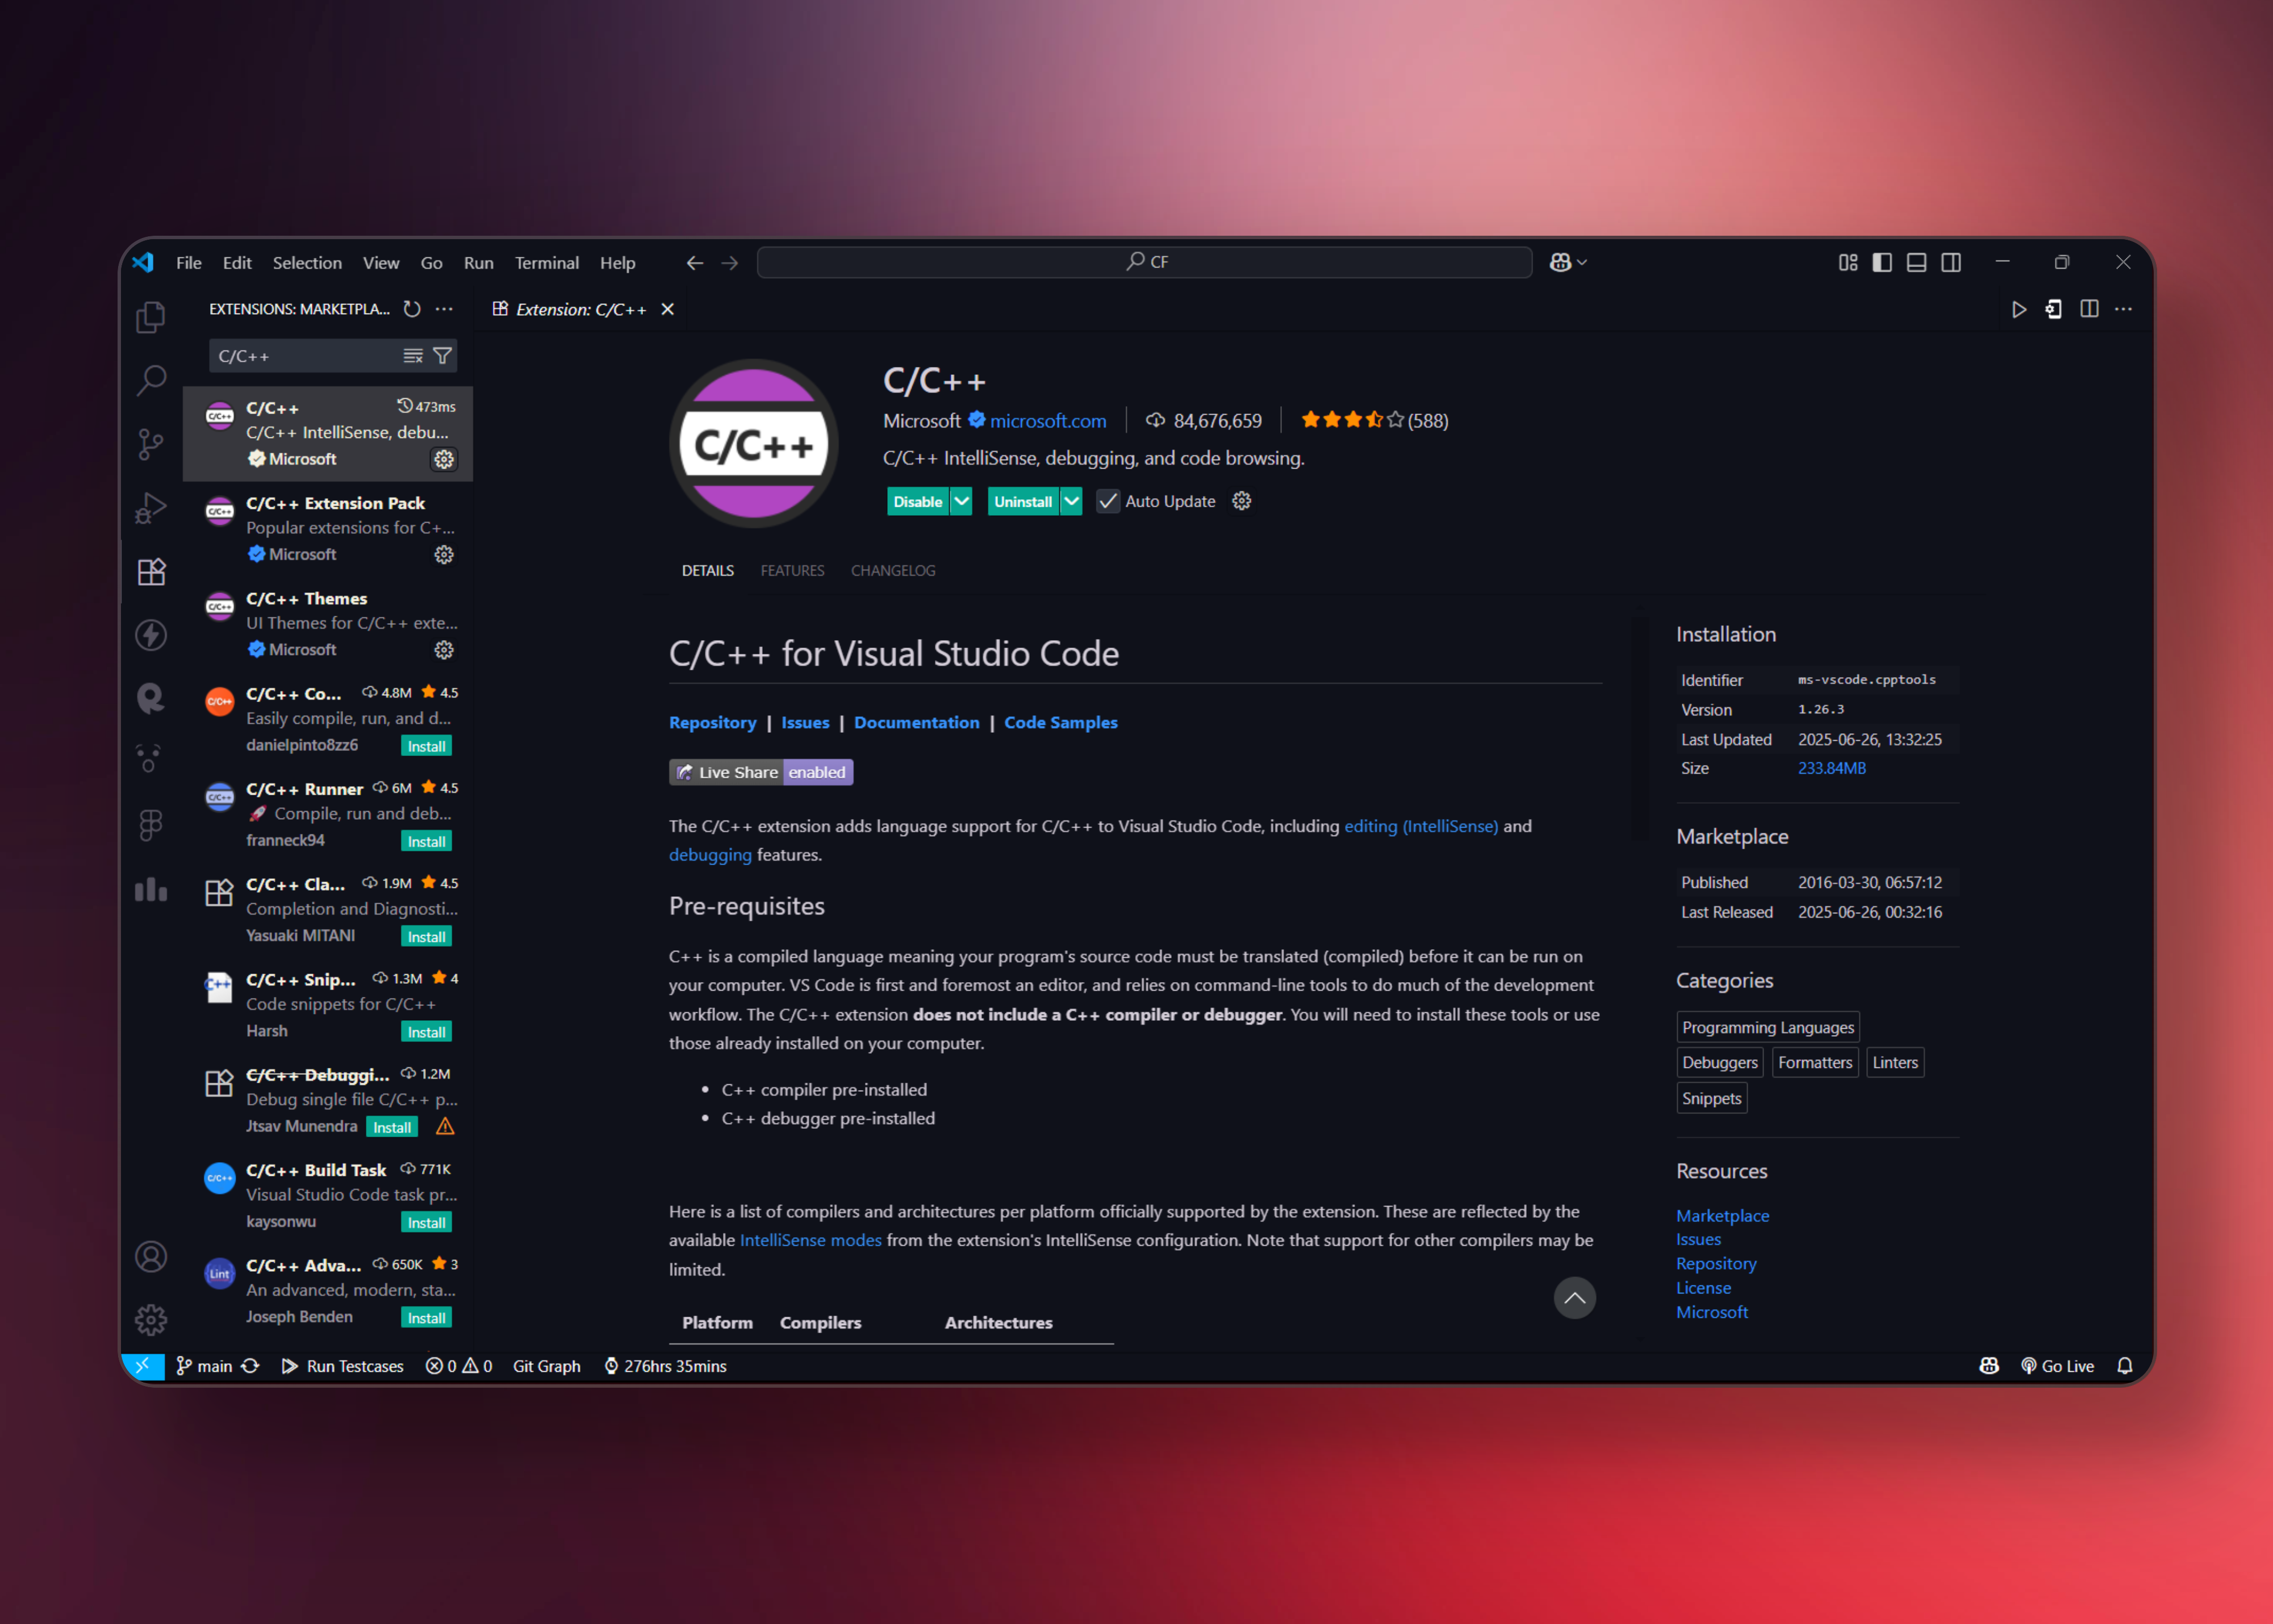
This extension pack provides:
- Syntax highlighting for better code readability
- IntelliSense for auto-completion
- Debugging capabilities
- Code formatting tools
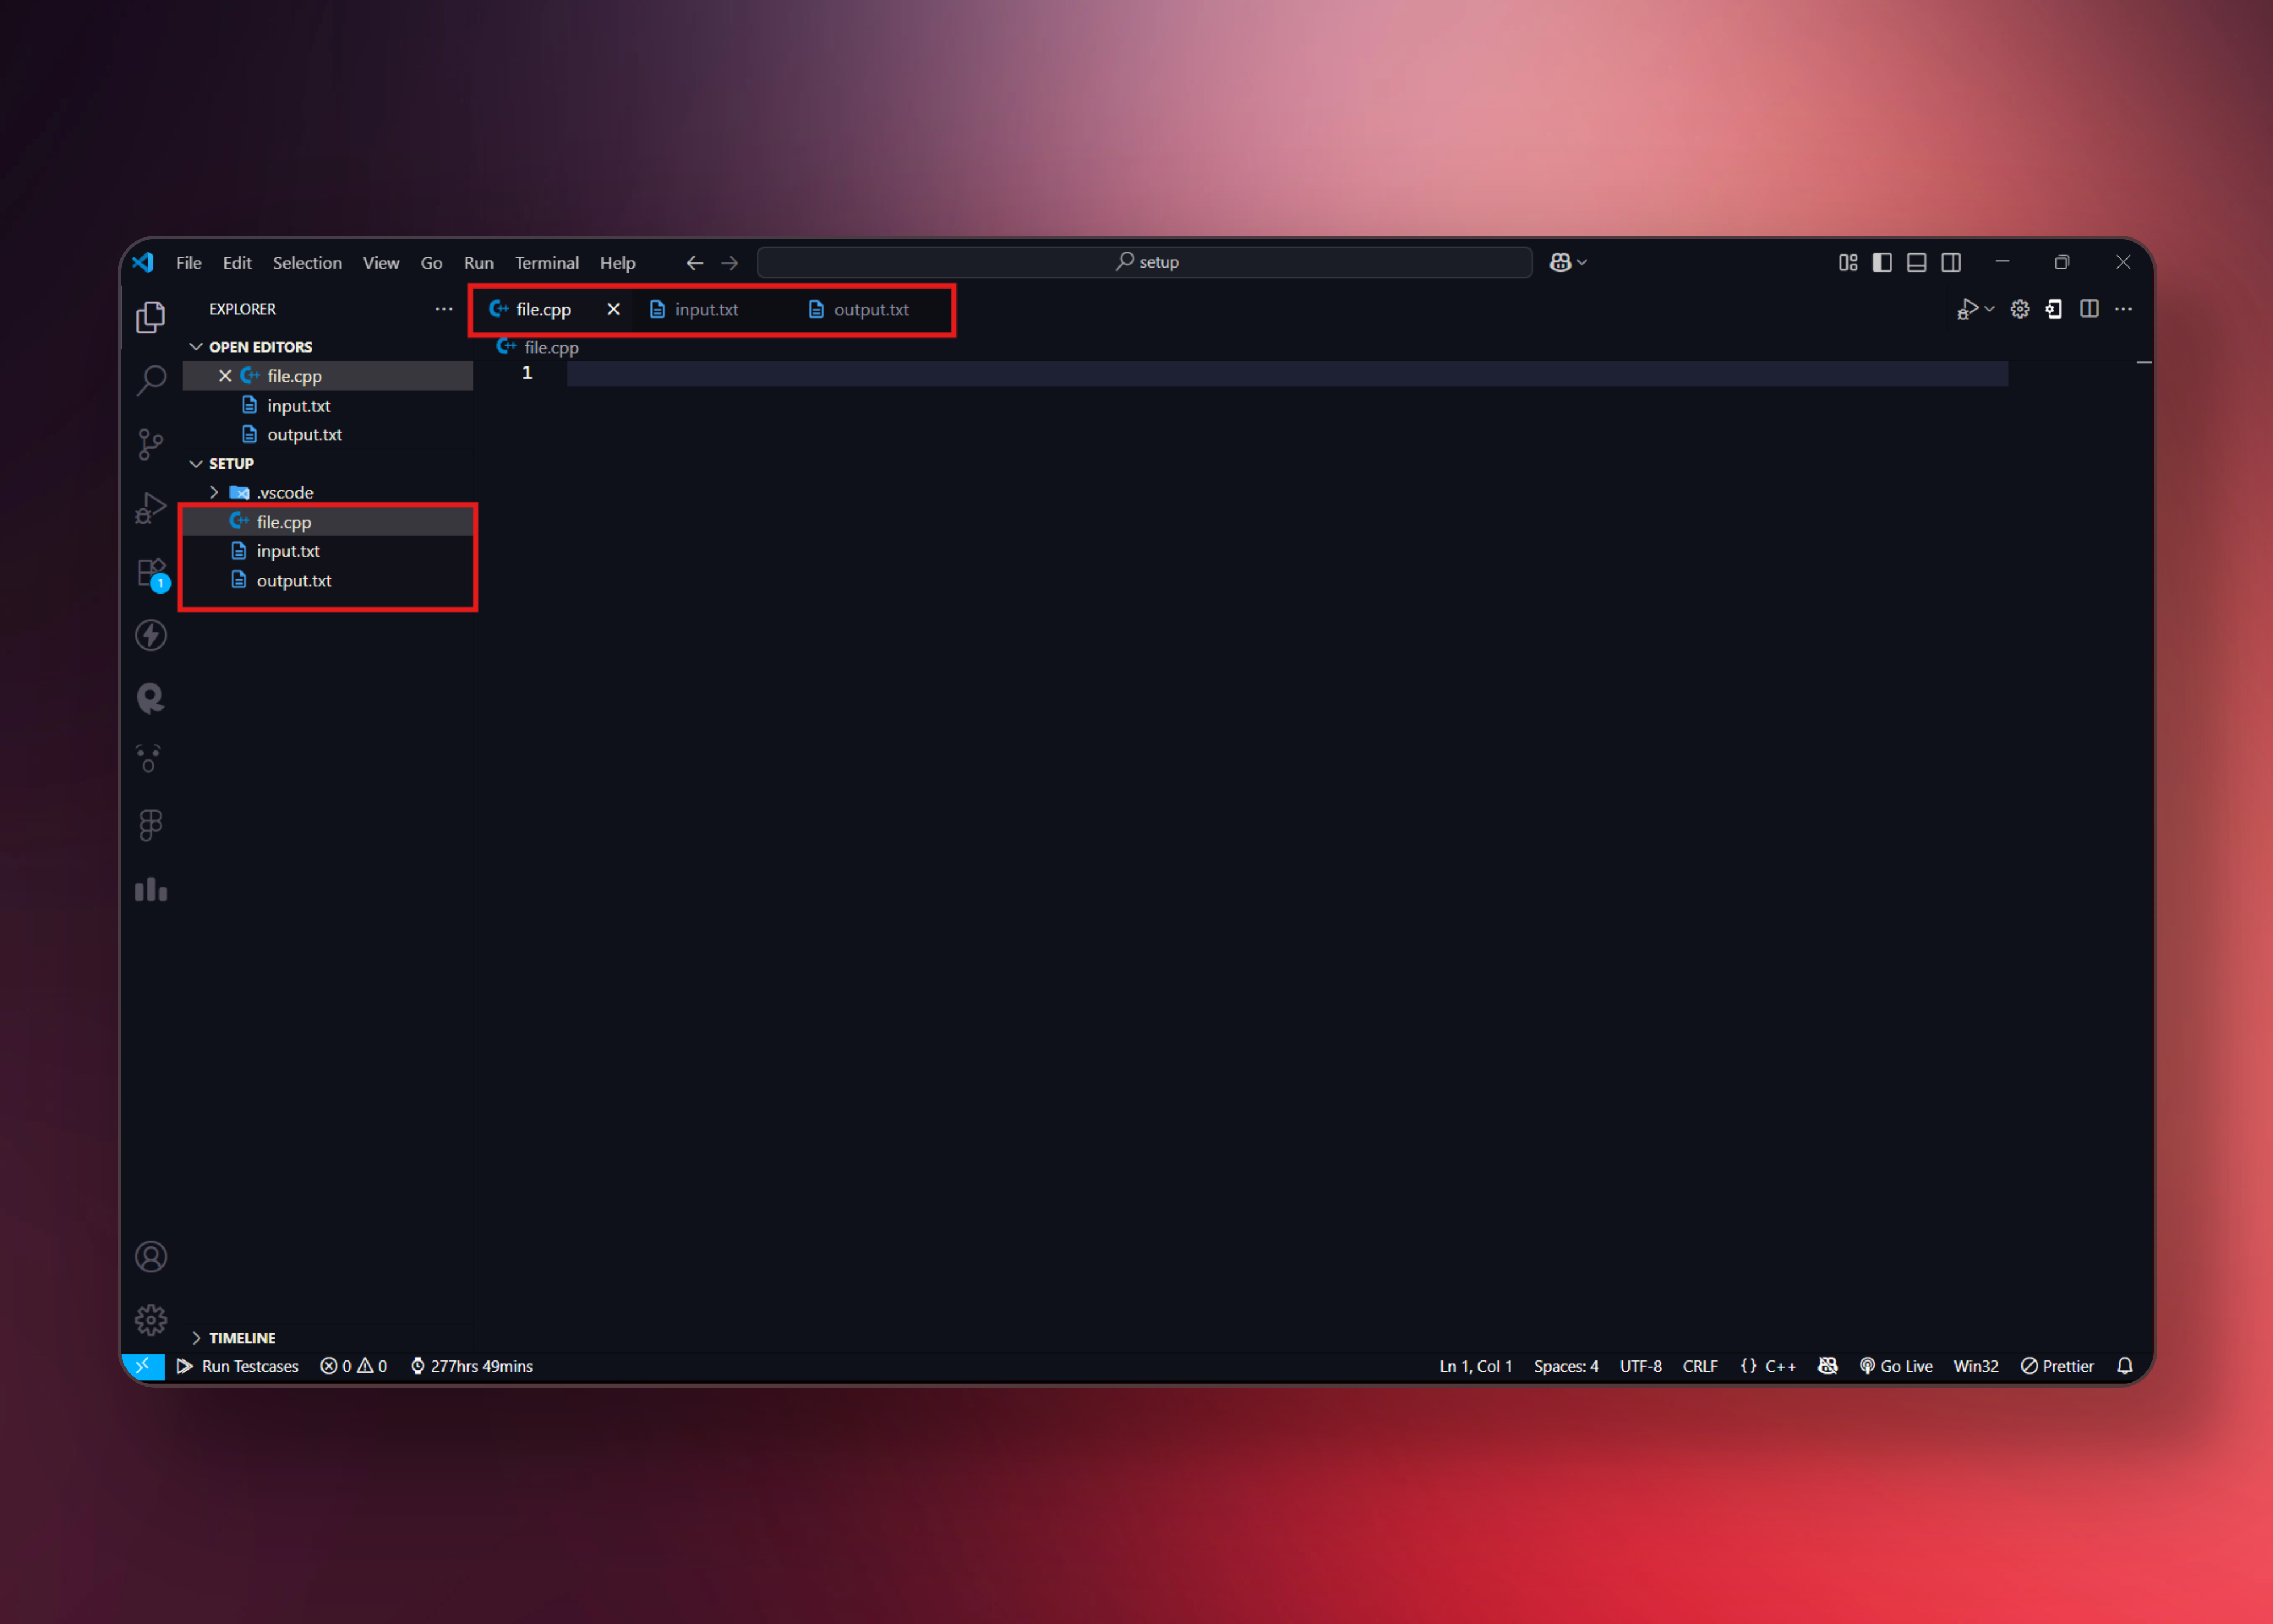
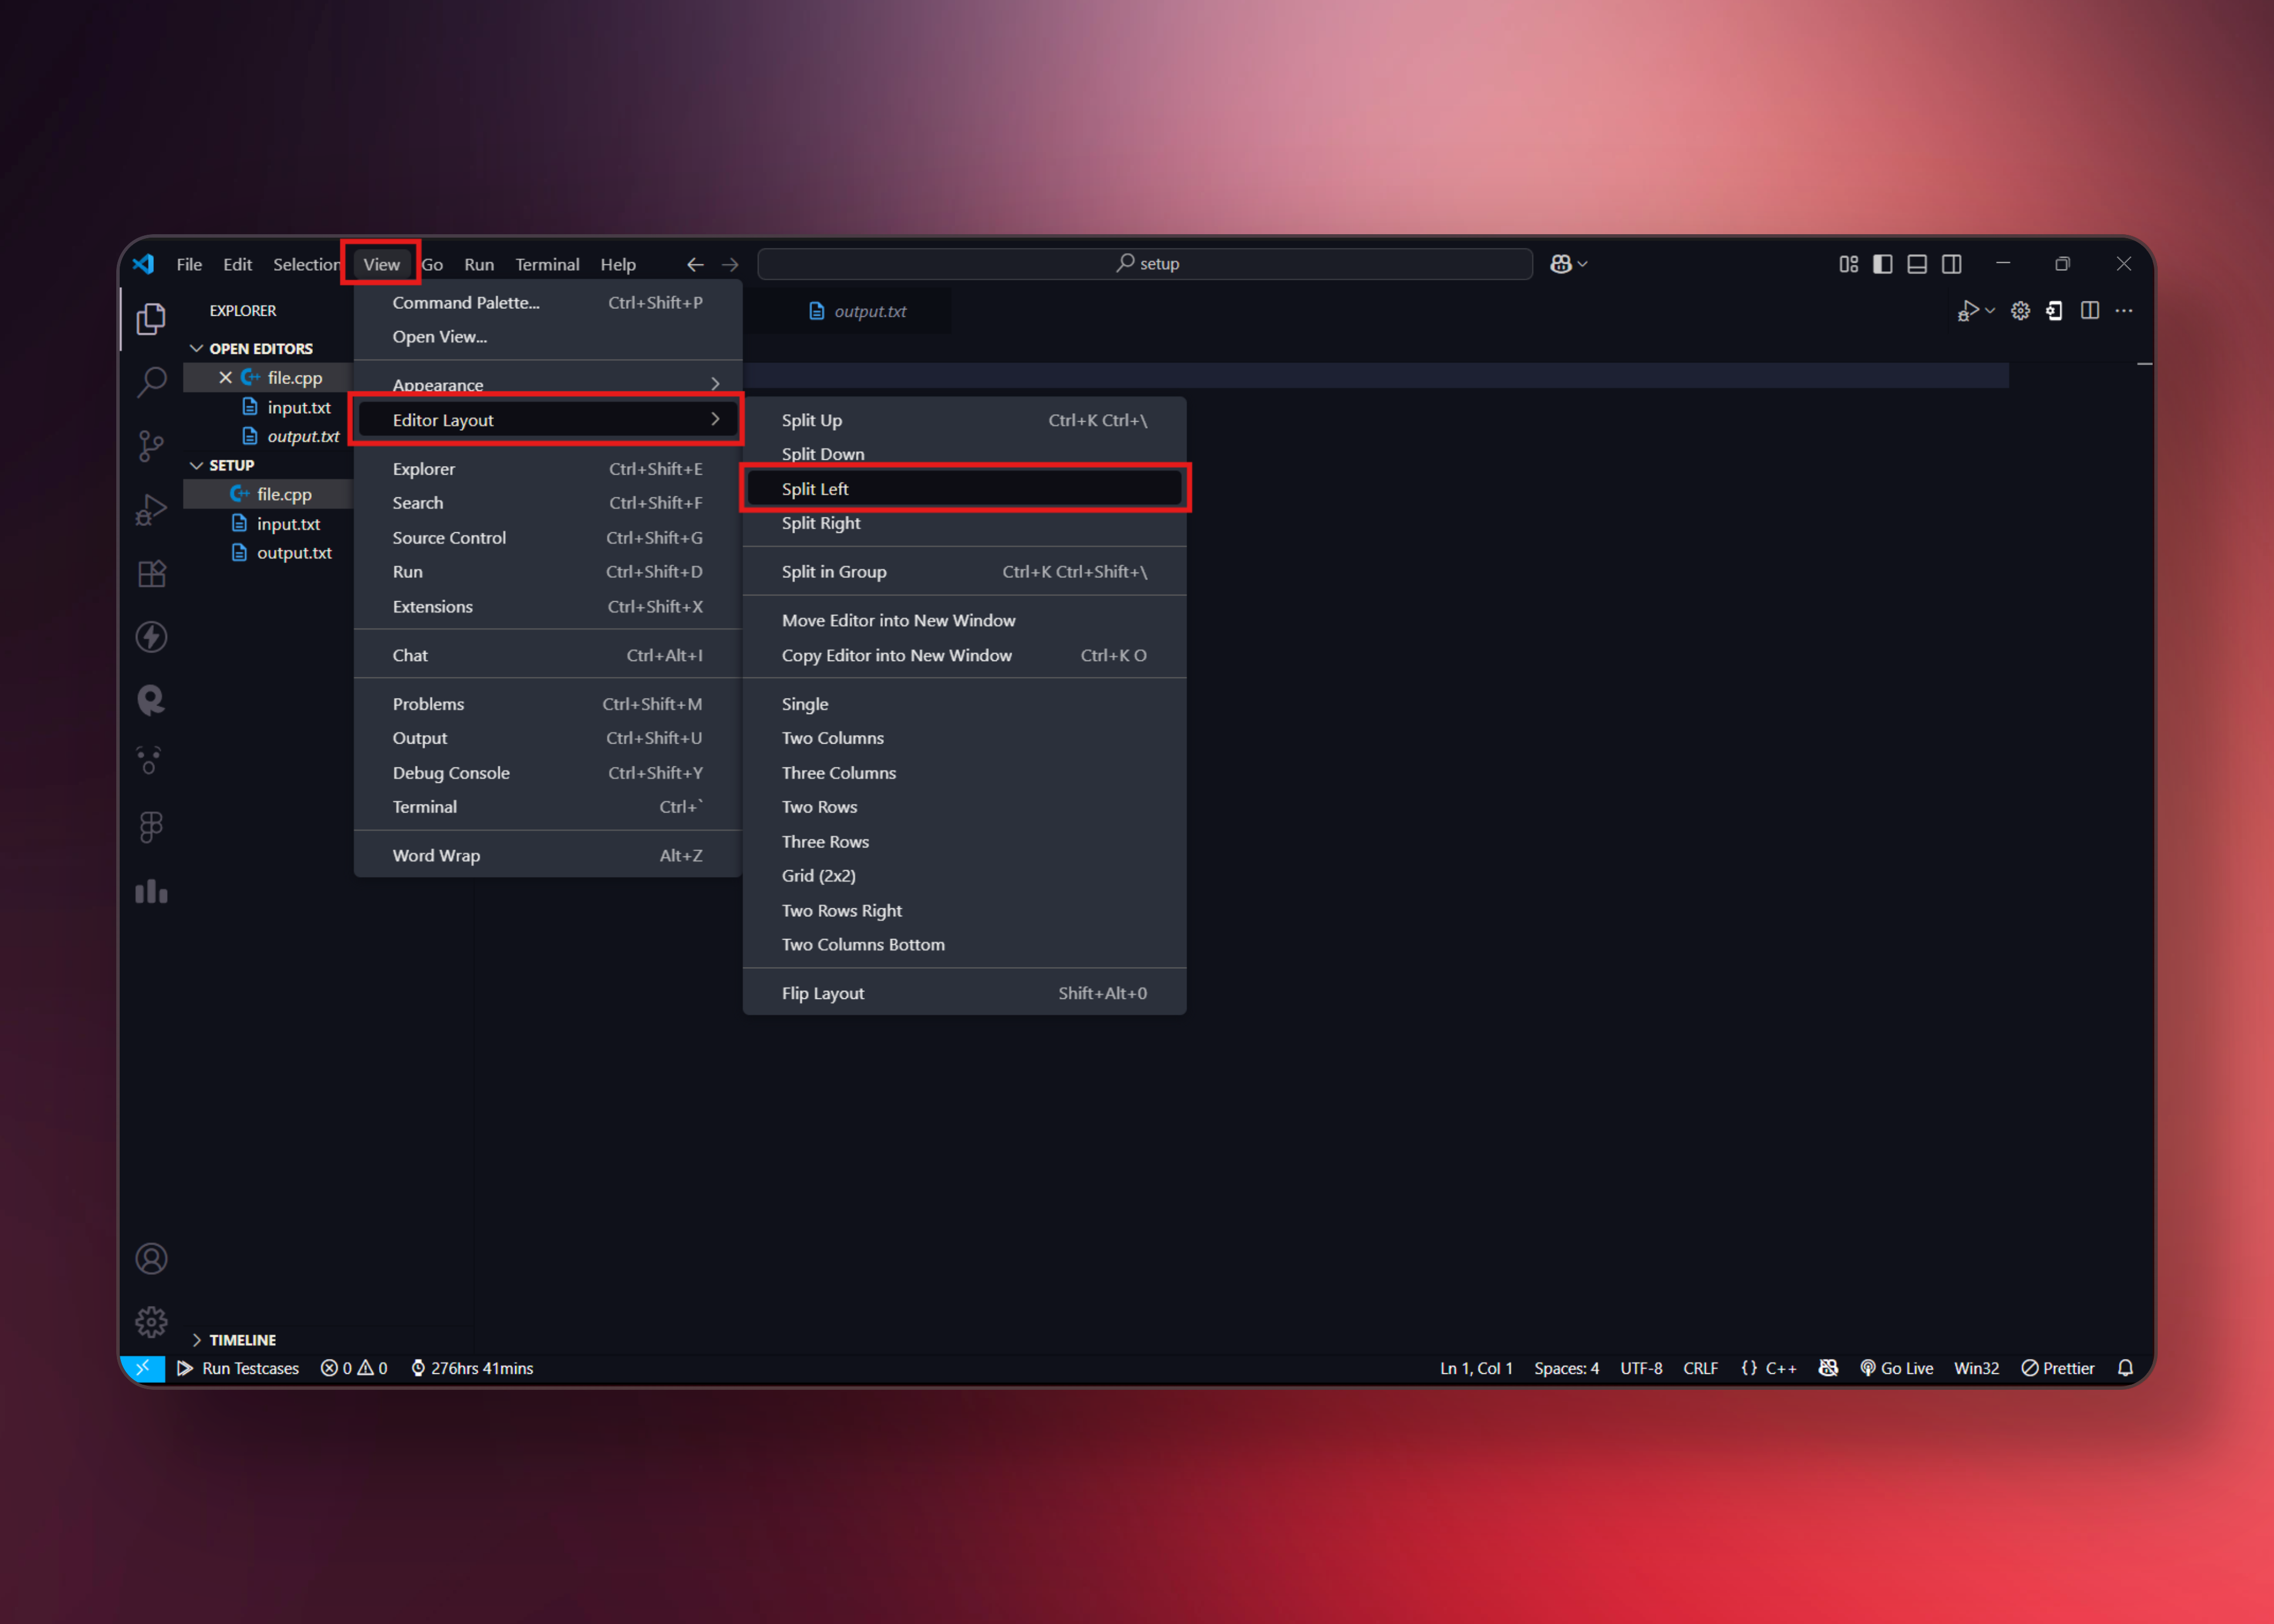
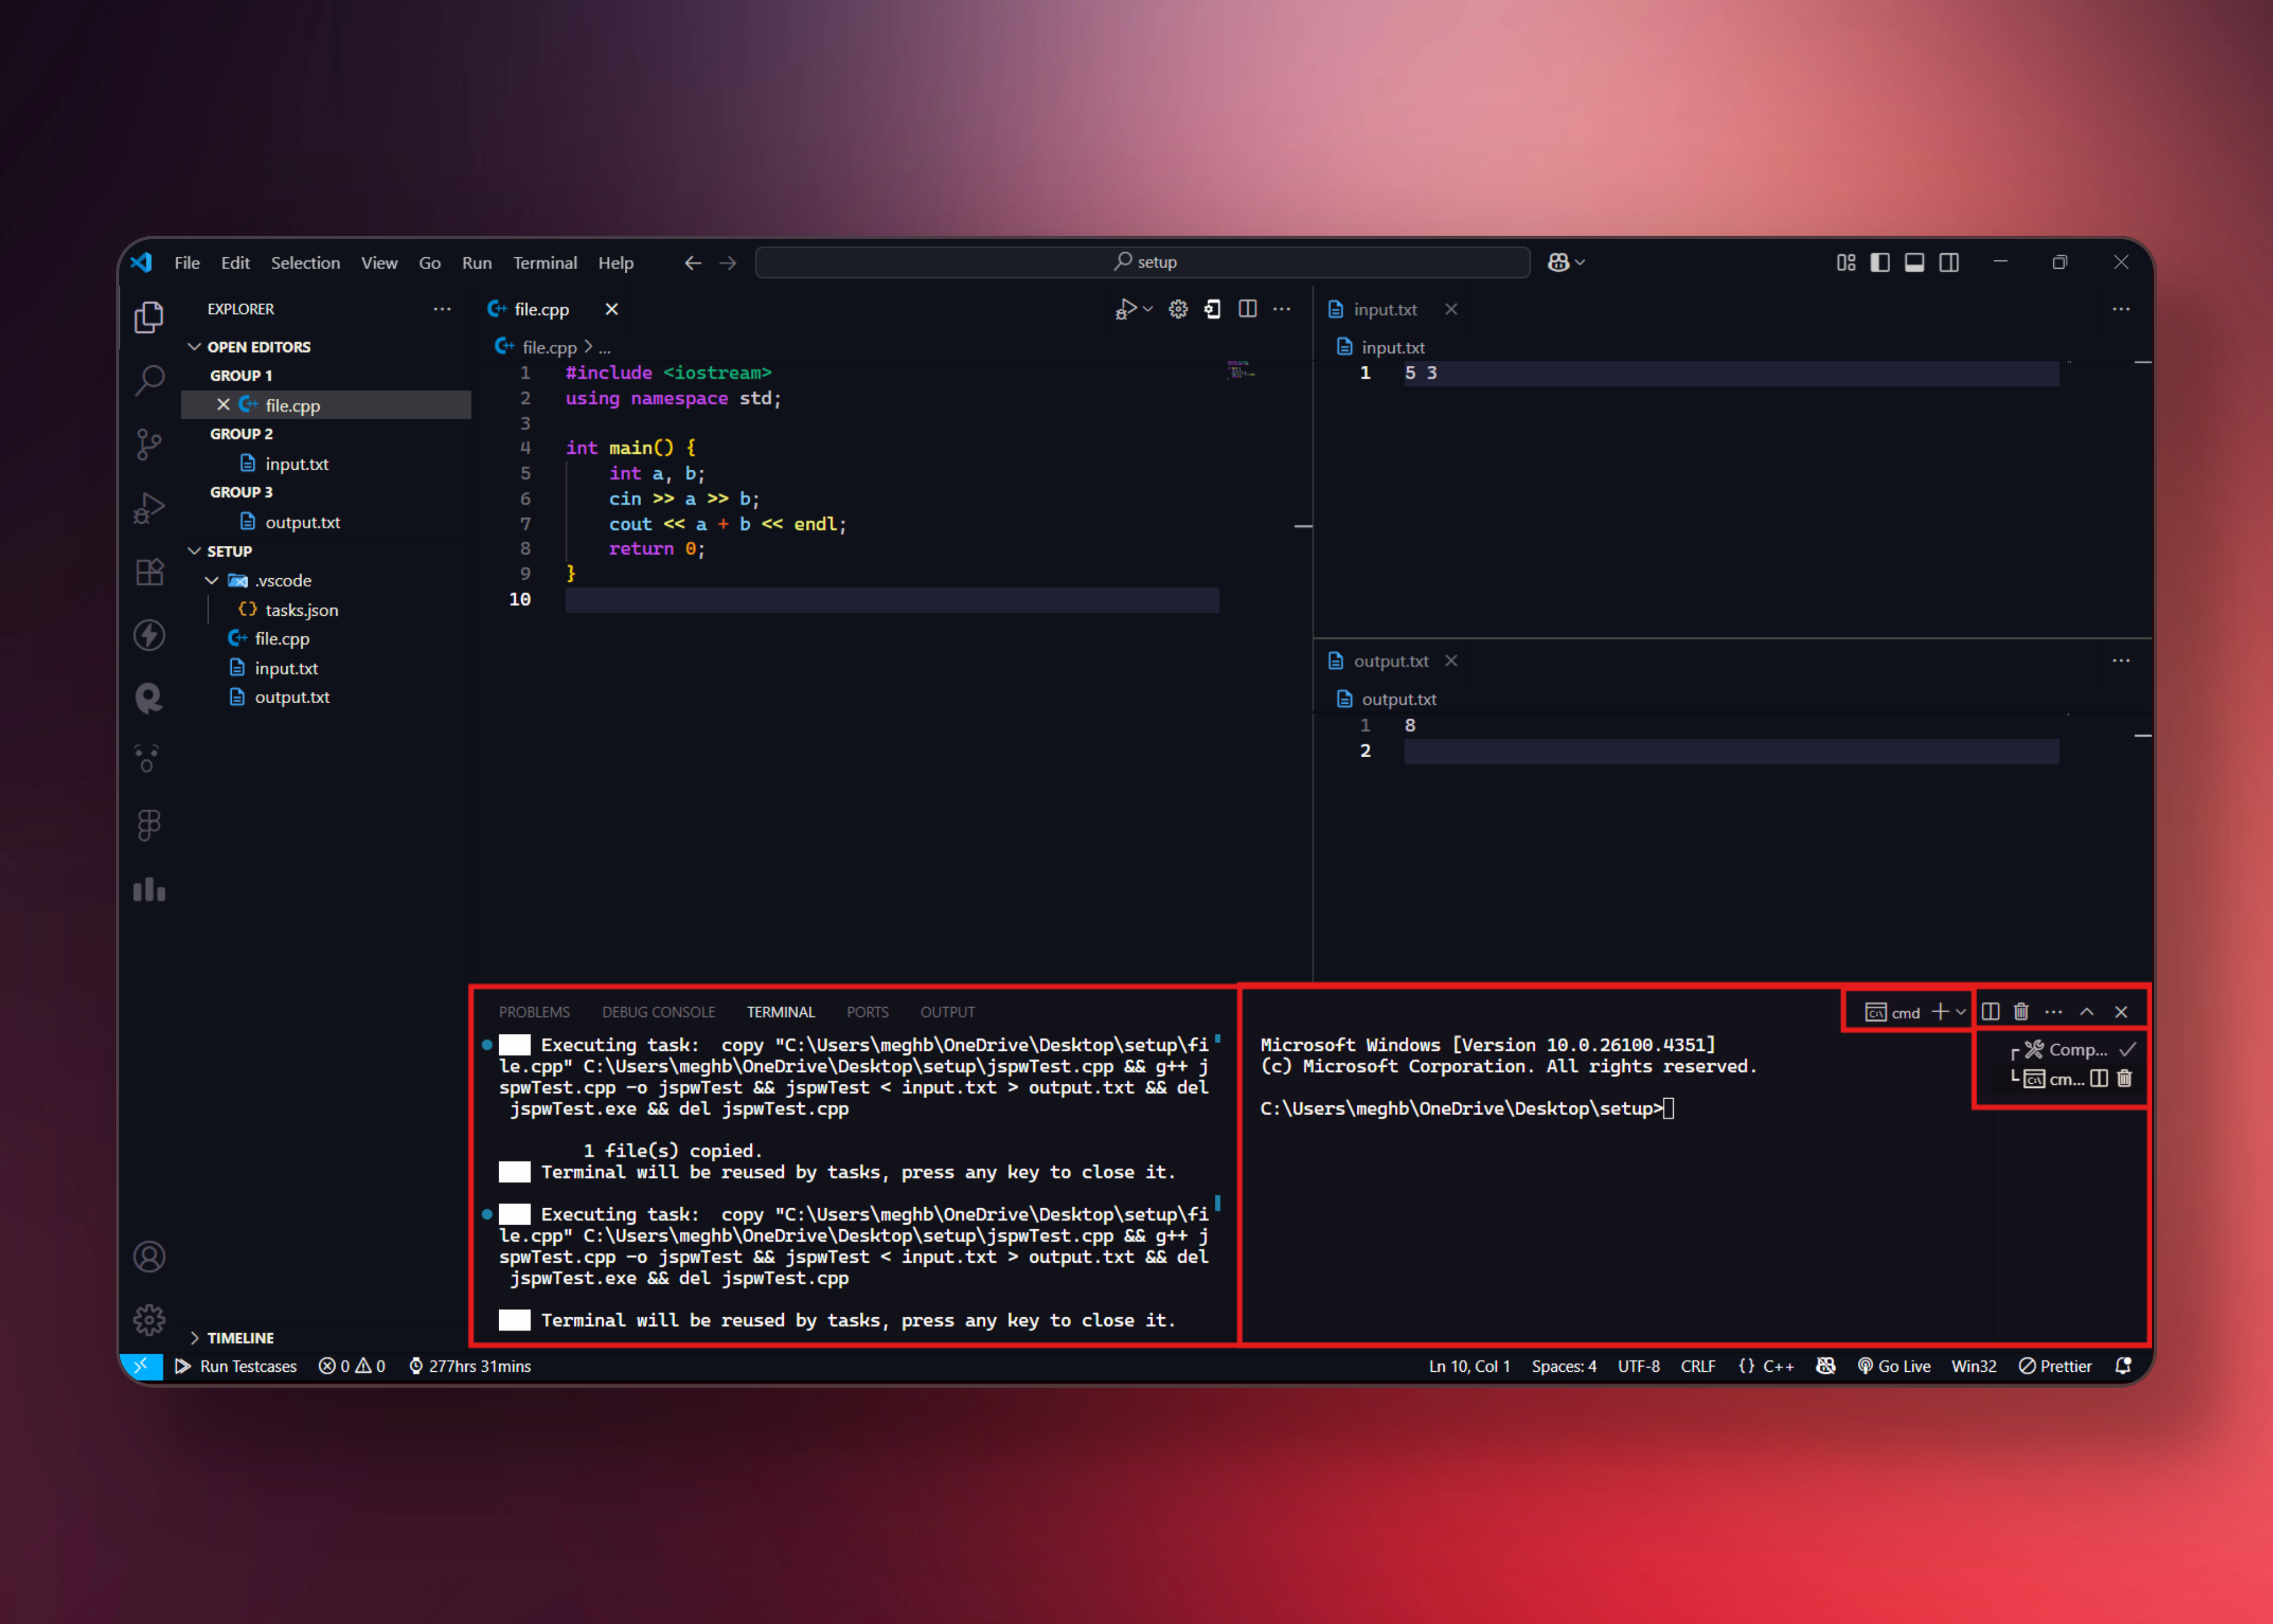
3. Organize Your Editor Layout
A well-organized layout helps you see your code, input, and output simultaneously.
- Open your
.cpp,input.txt, andoutput.txtfiles side by side
- To do this:
- Go to View → Editor Layout → Split Left for your .cpp file
- Select input.txt, then repeat the split to arrange all three files as needed
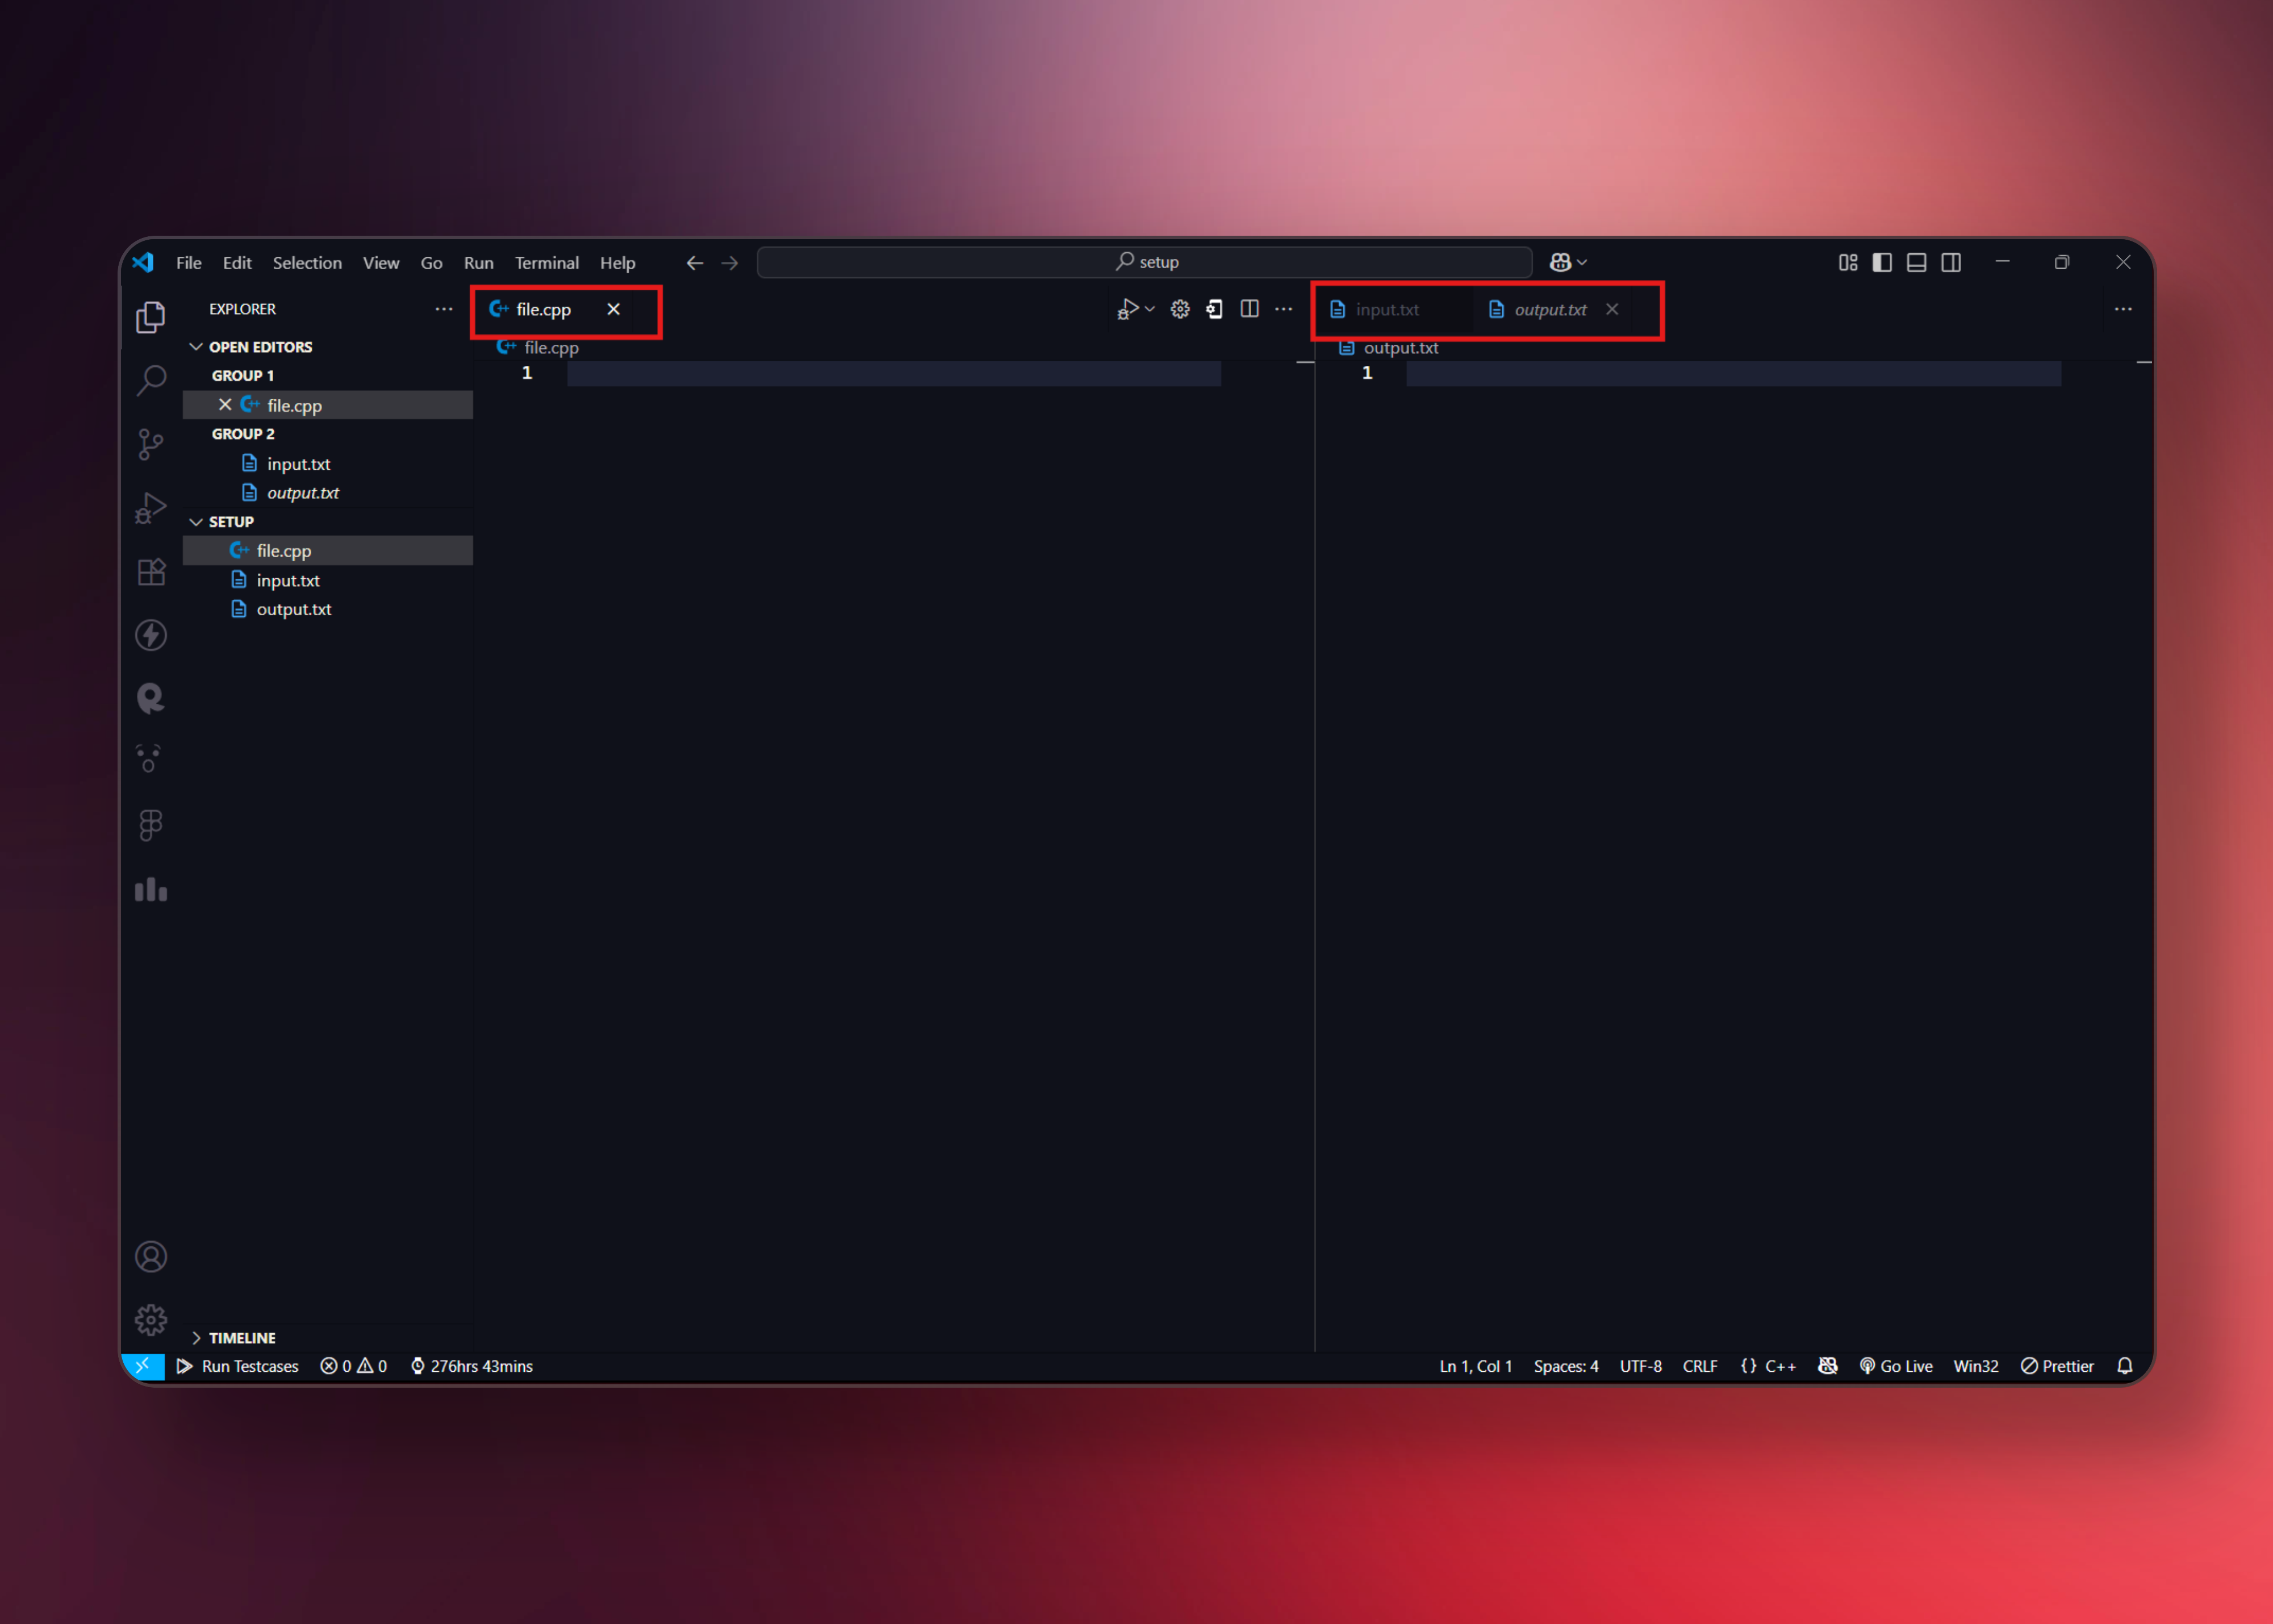
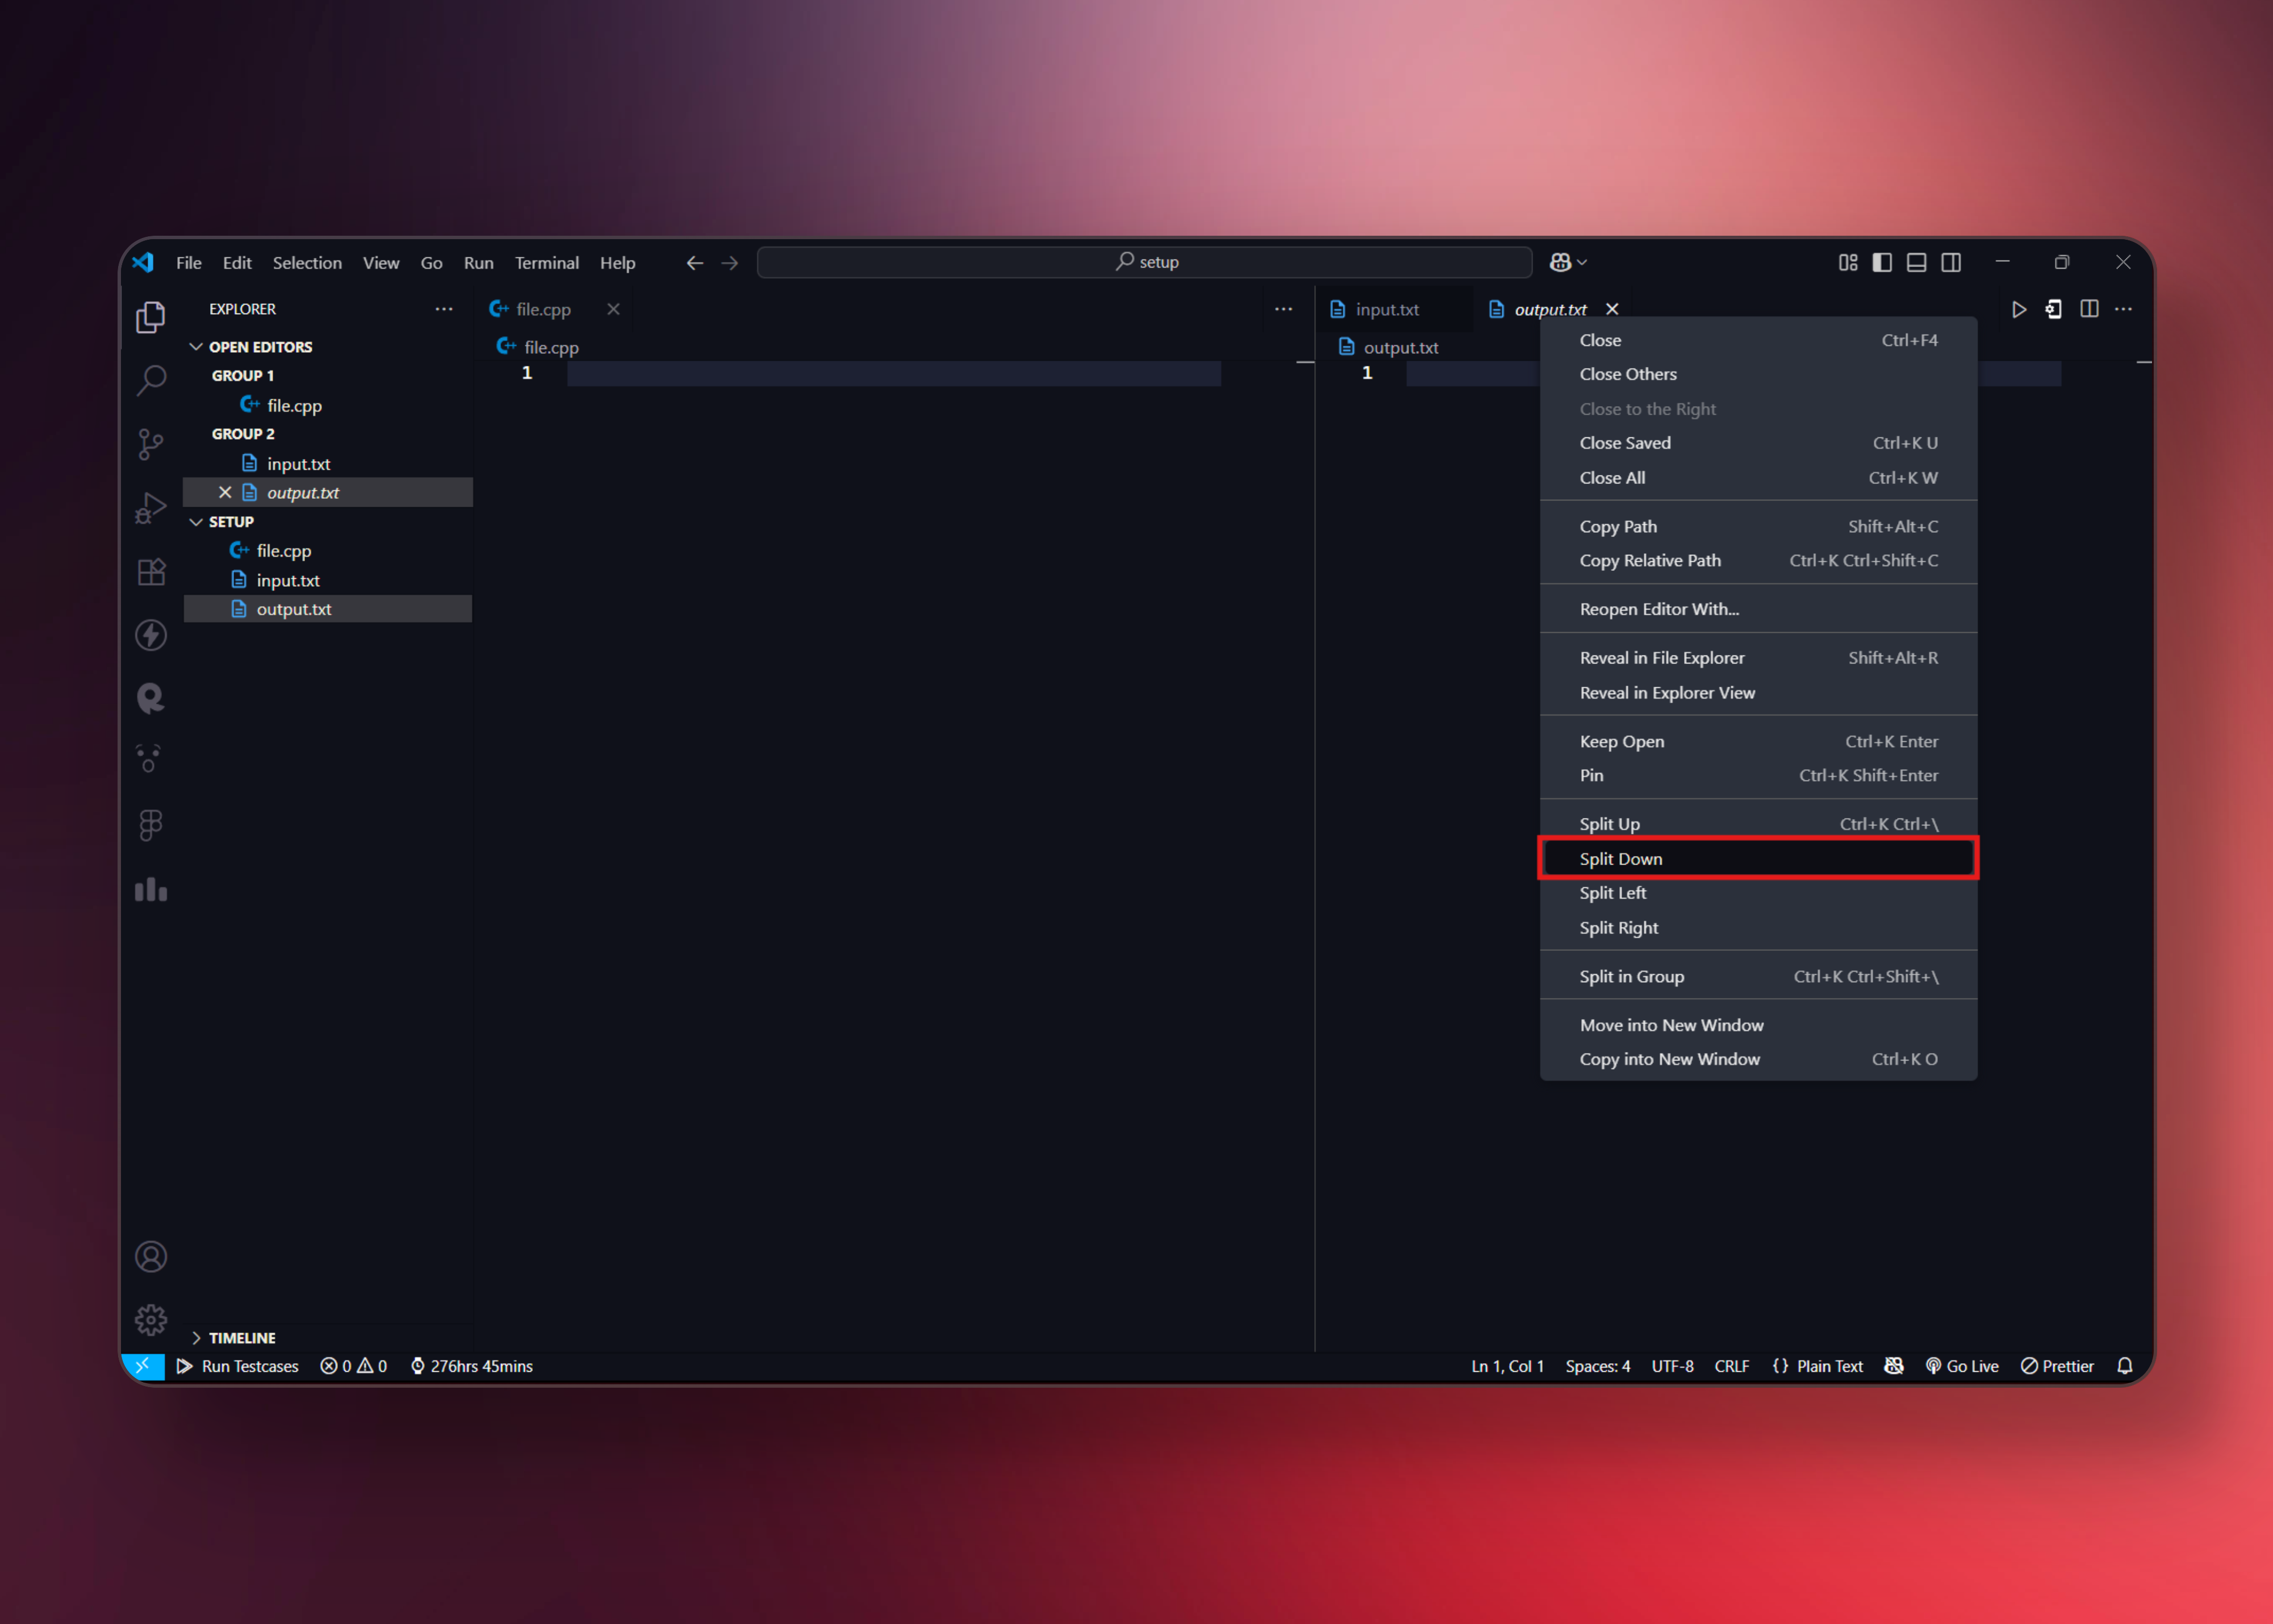
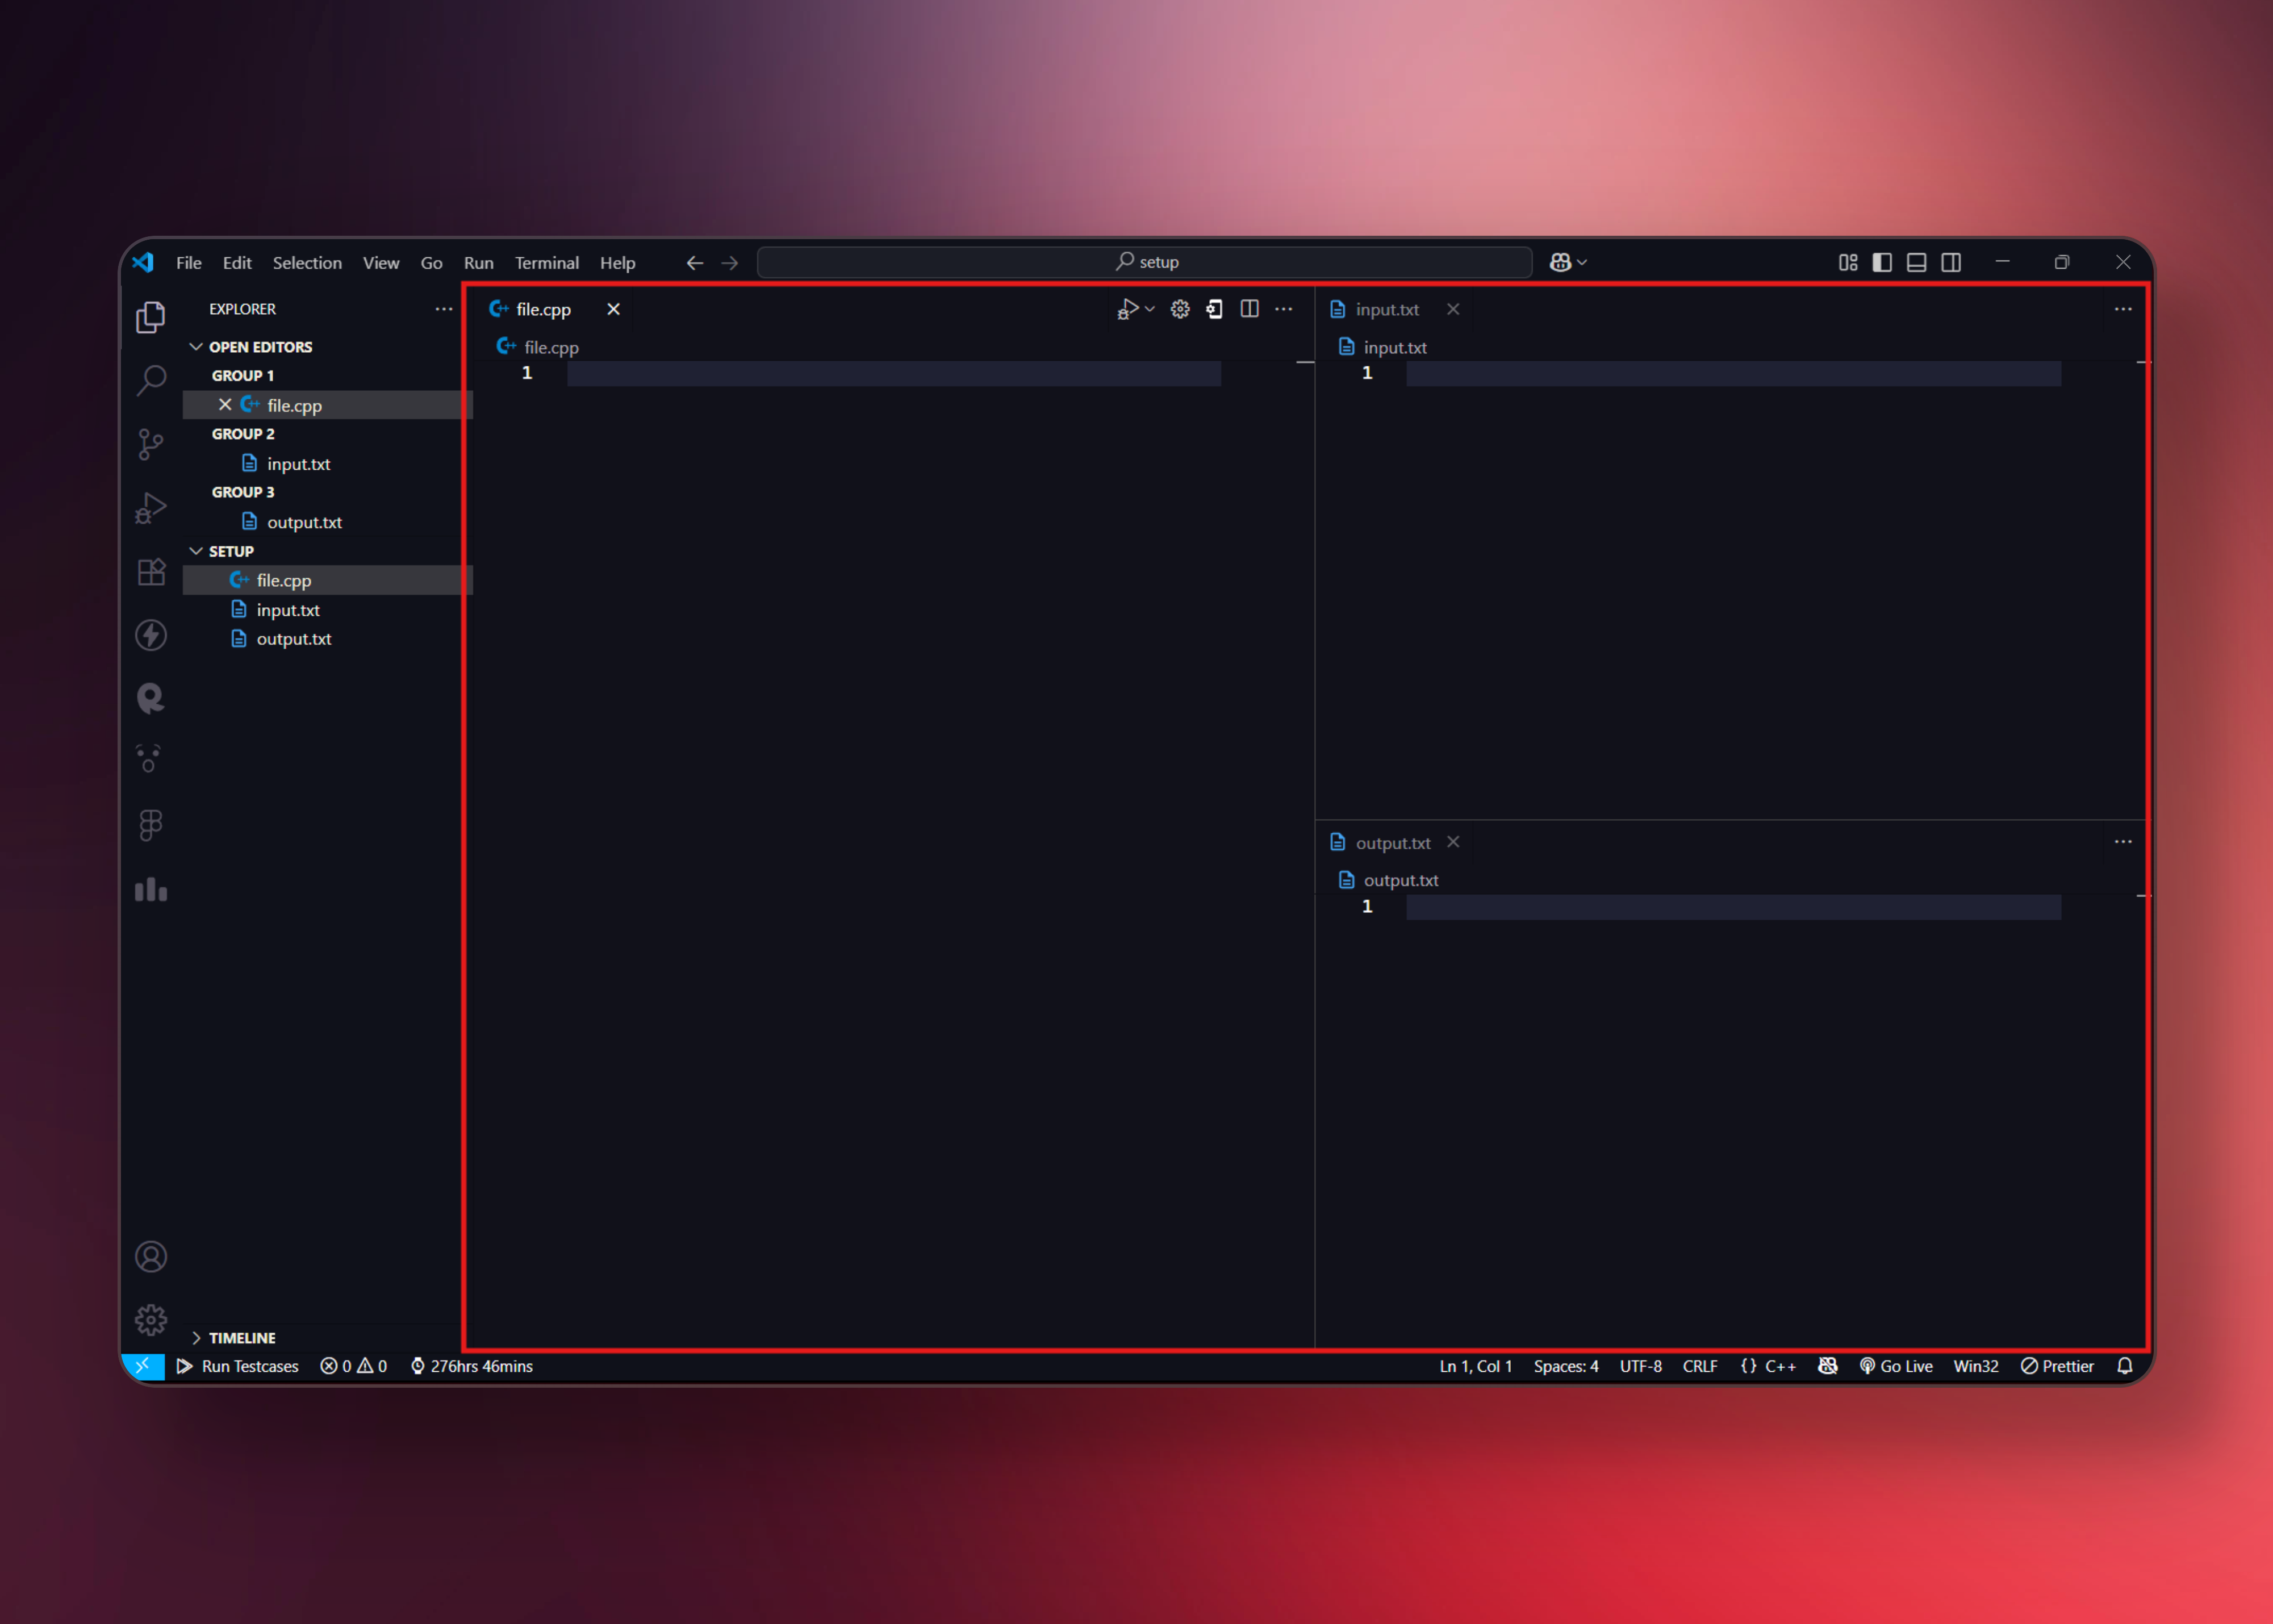
This layout allows you to:
- Write code in the main panel
- Provide test inputs in the right panel (up)
- View outputs in the right panel (down)
4. Configure Build and Run Tasks
This is the most crucial step that automates compilation and execution with input/output redirection.
For Mac Users
- Go to Terminal → Configure Tasks → Create tasks.json file from template → Others
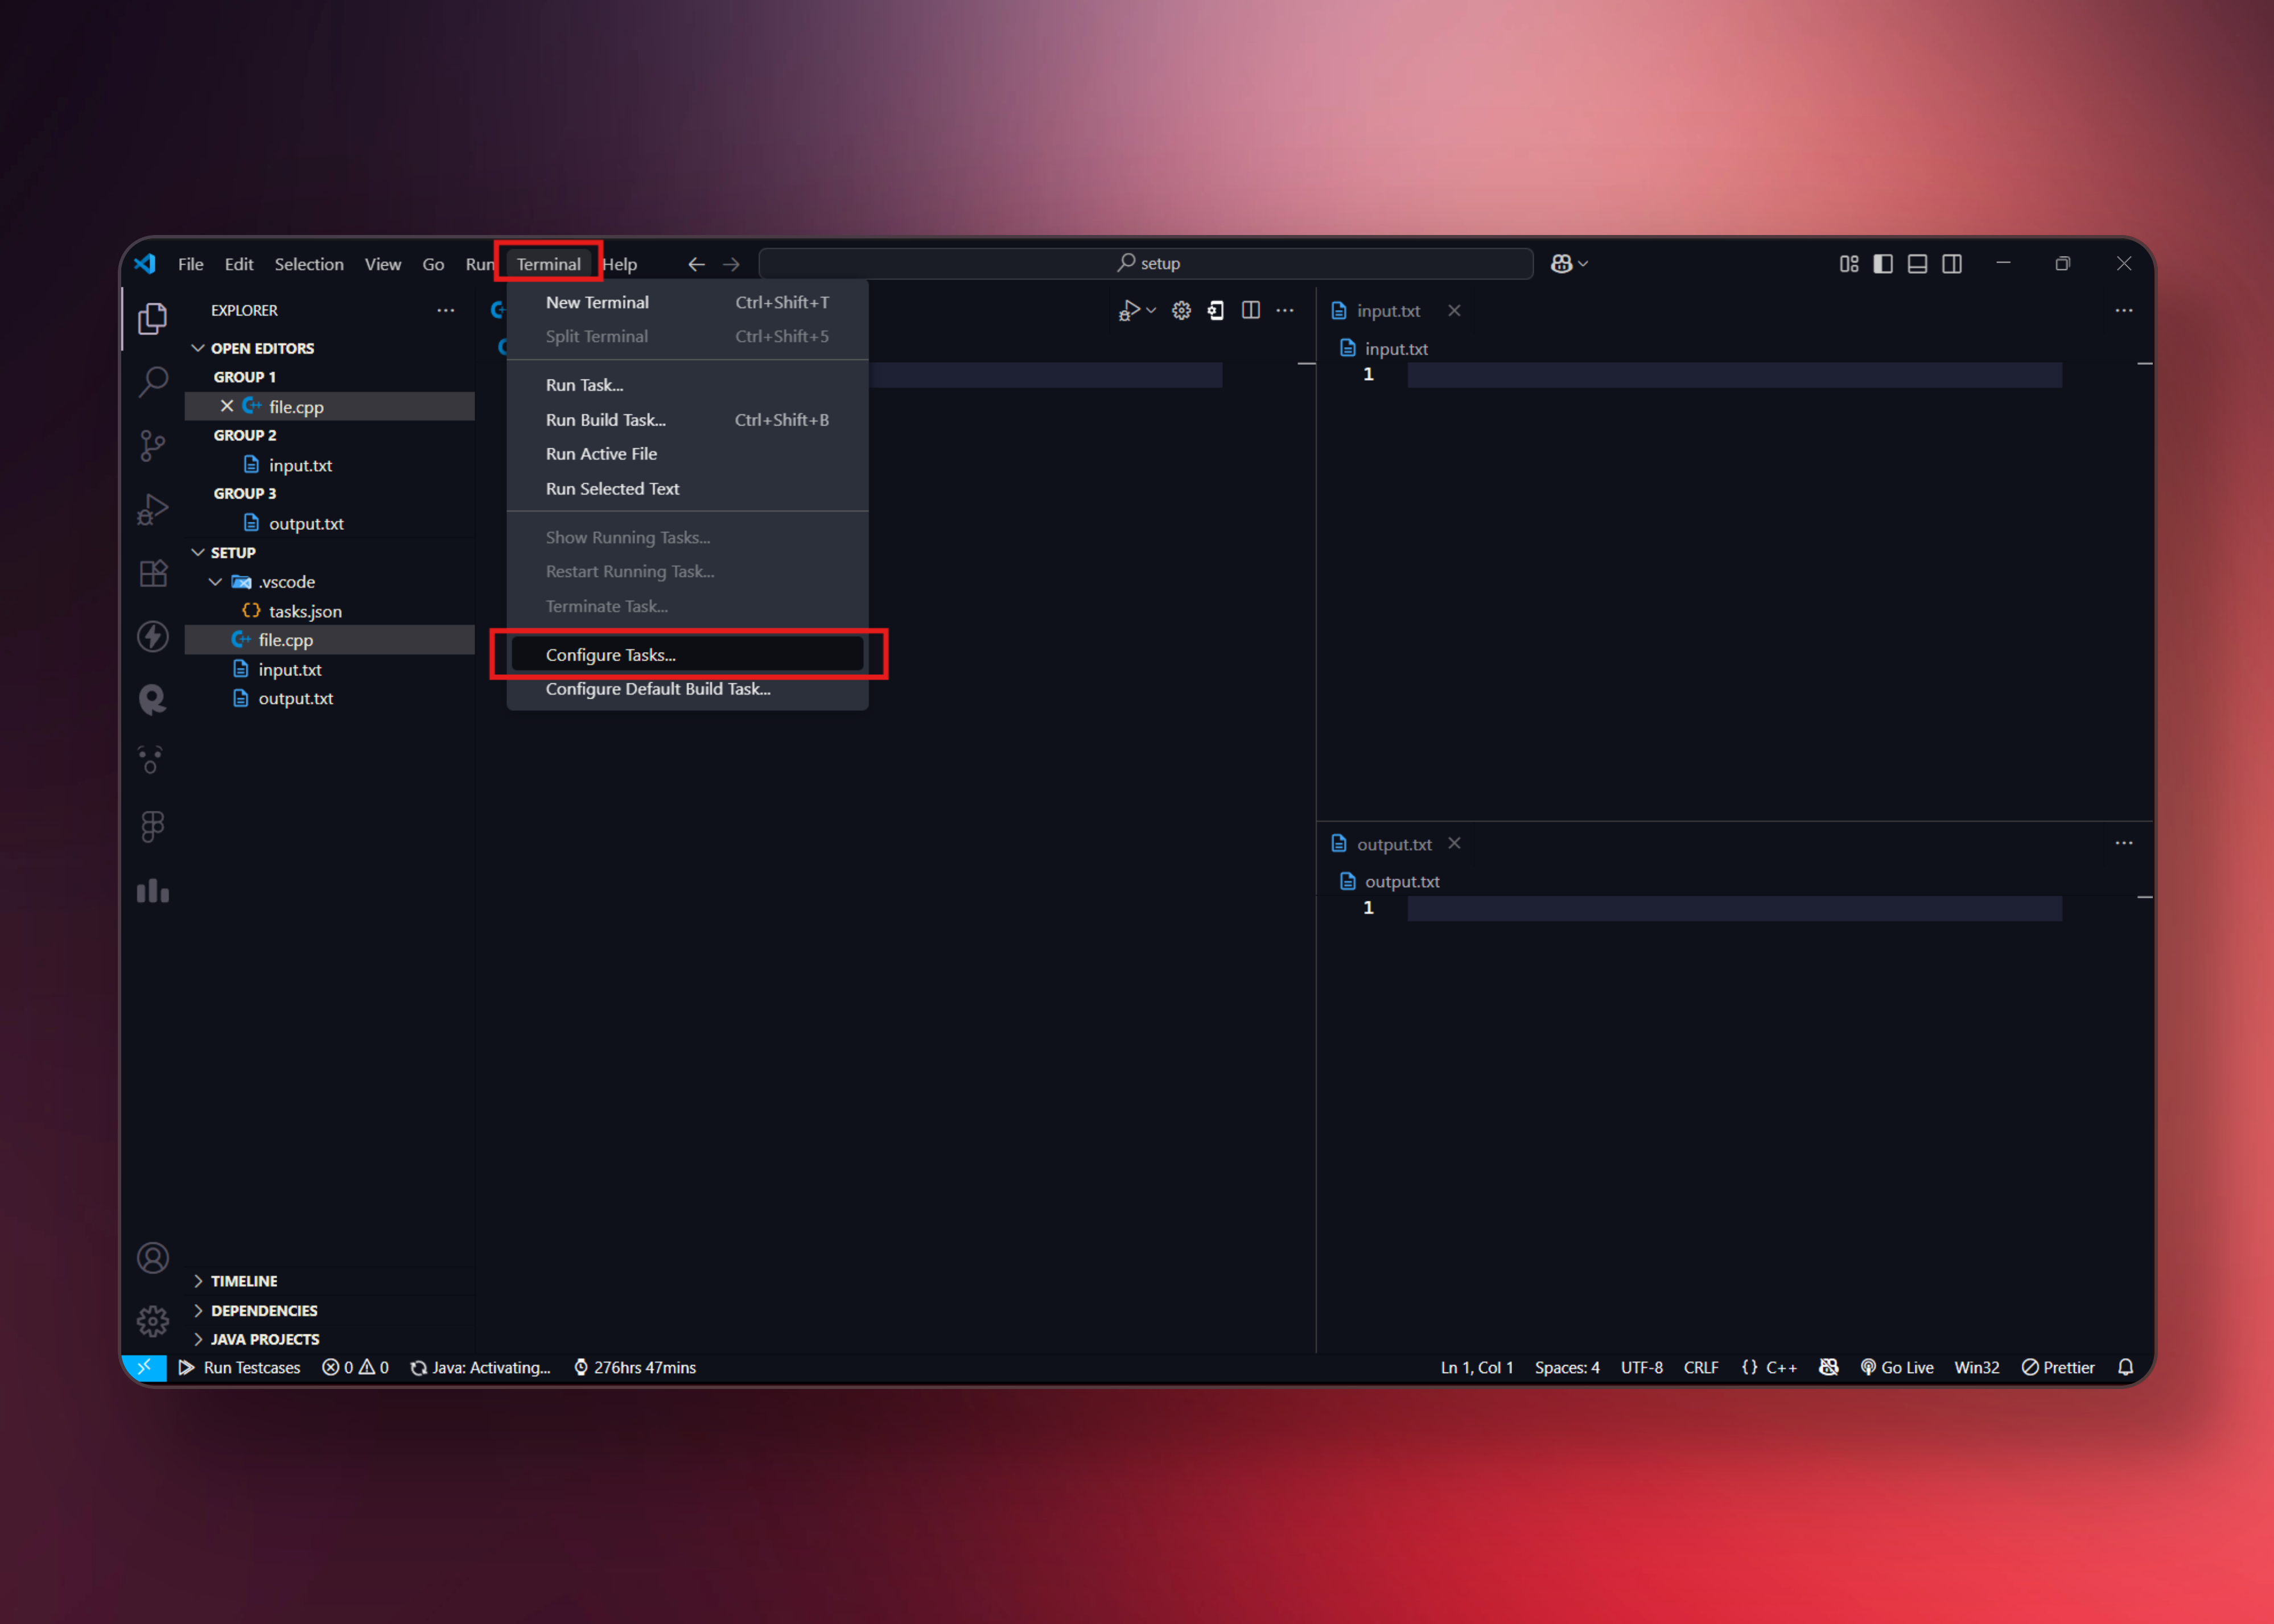
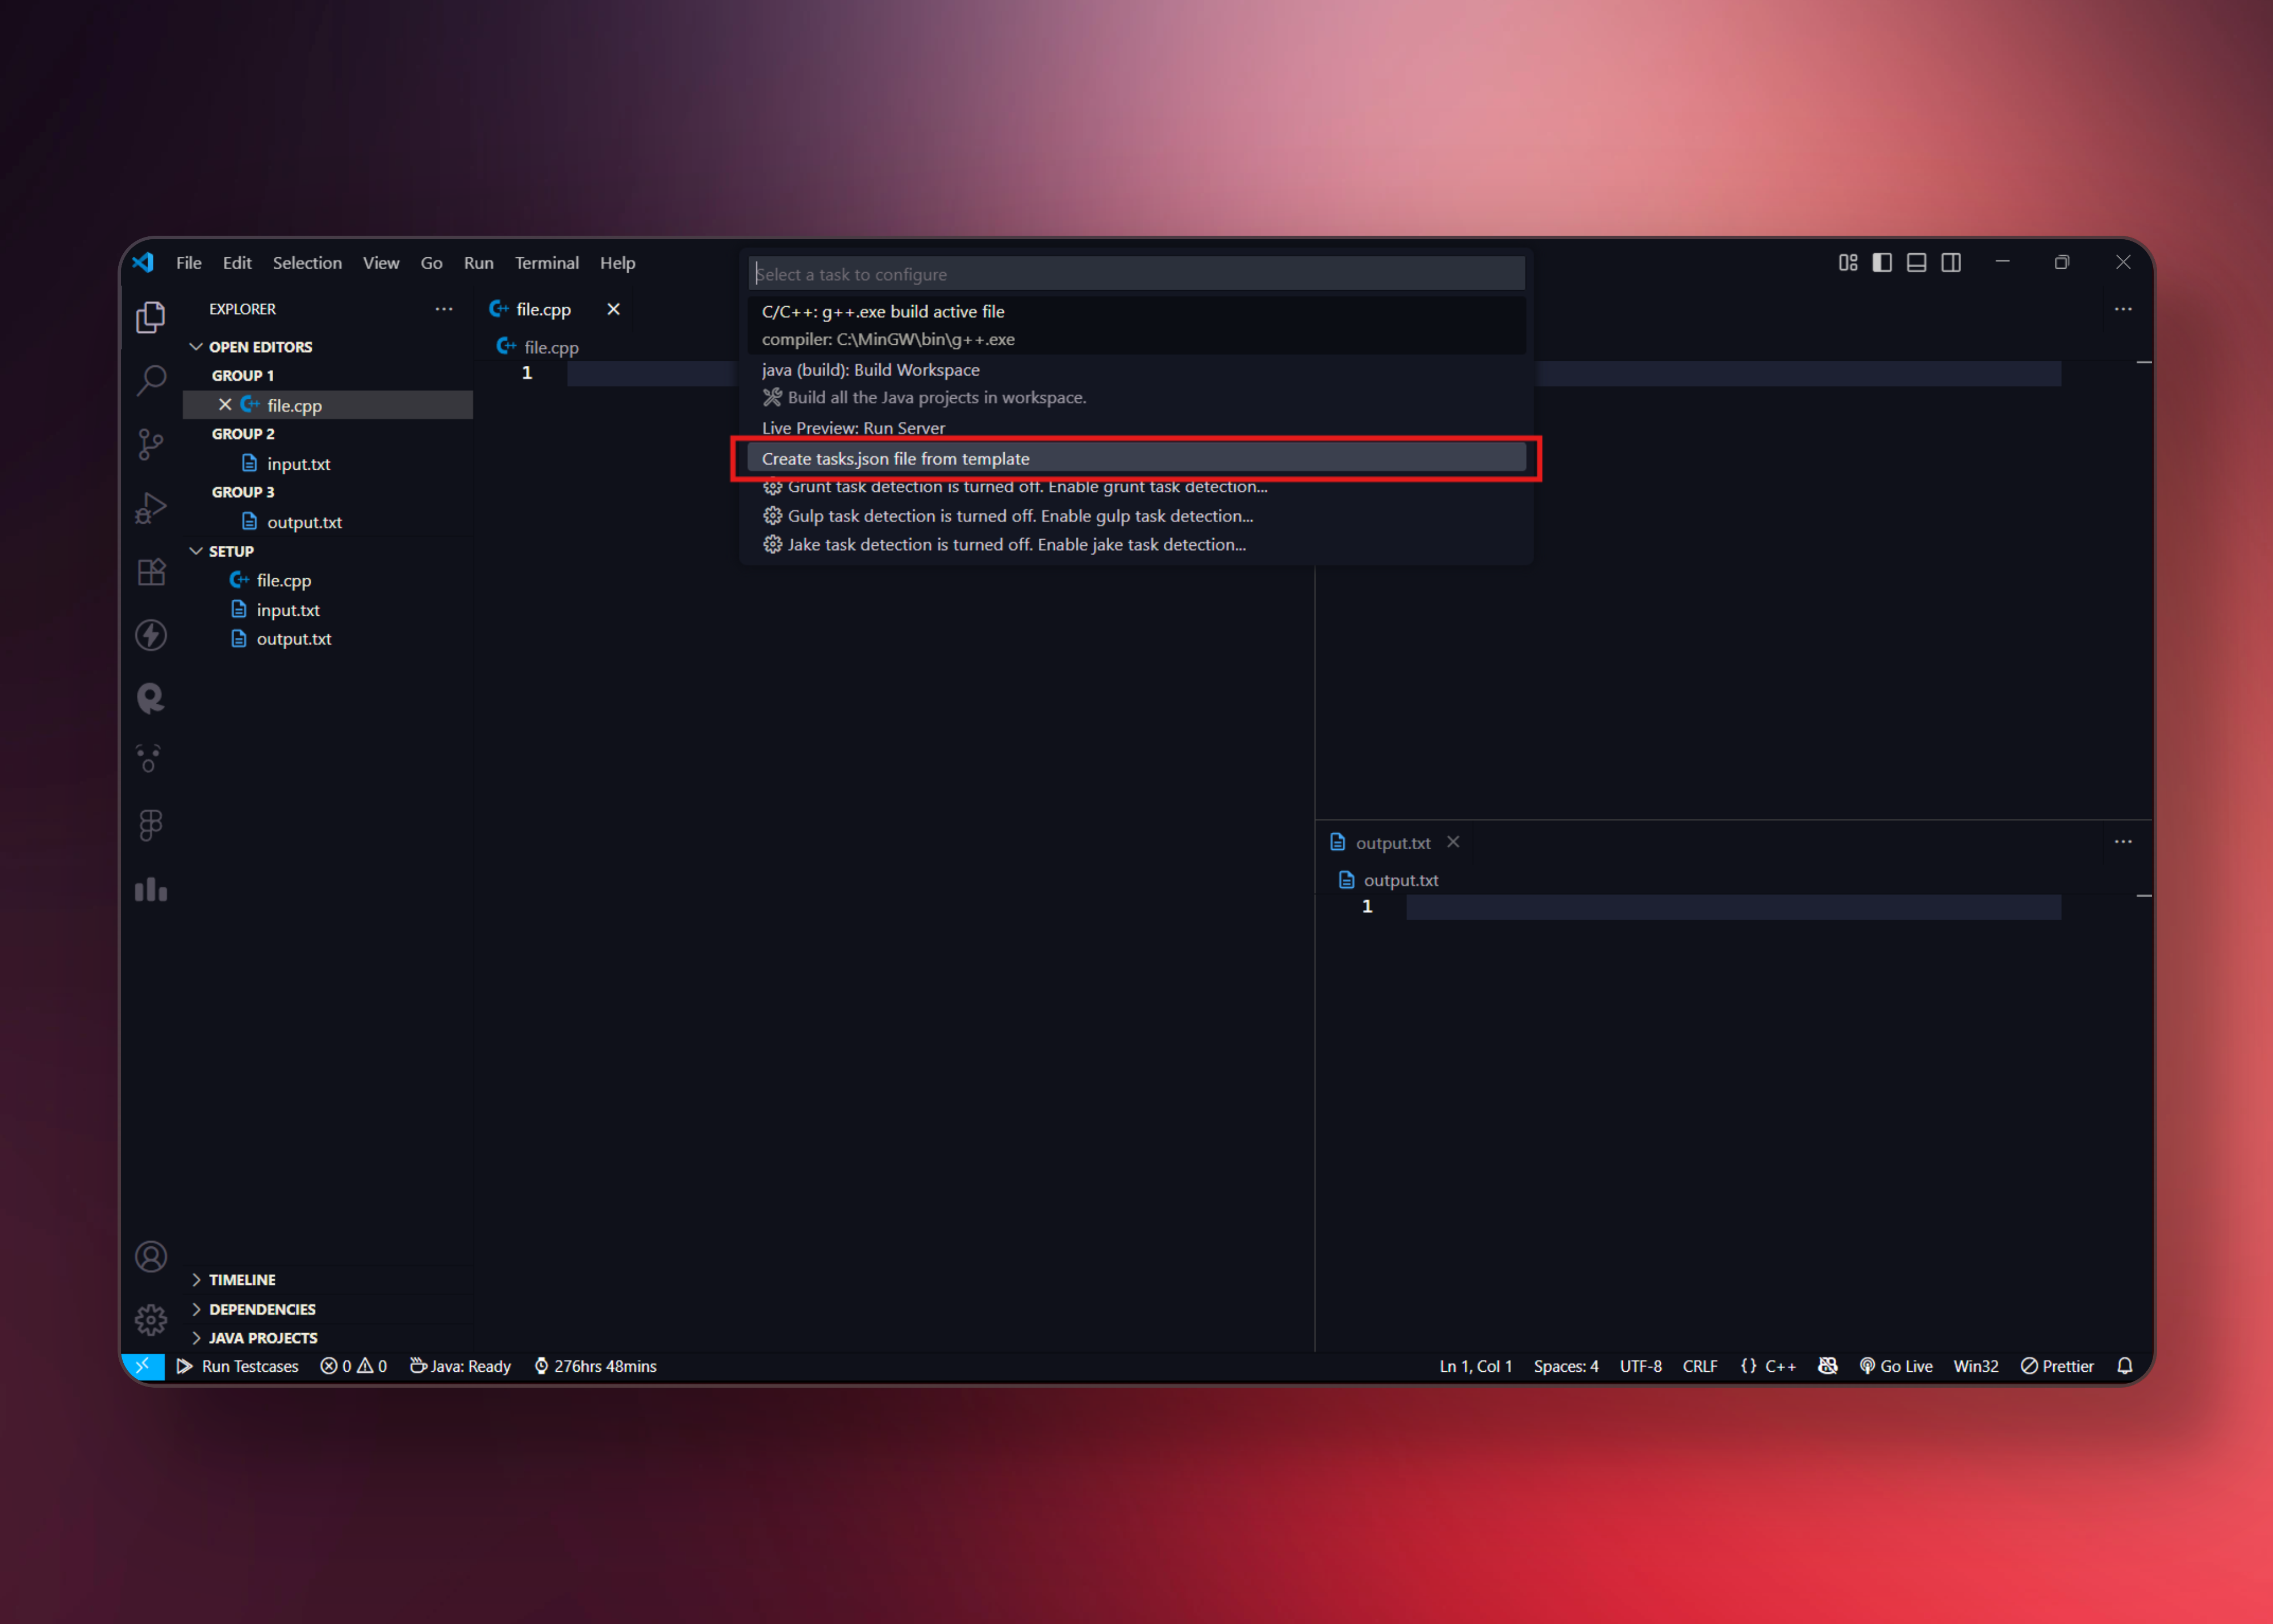
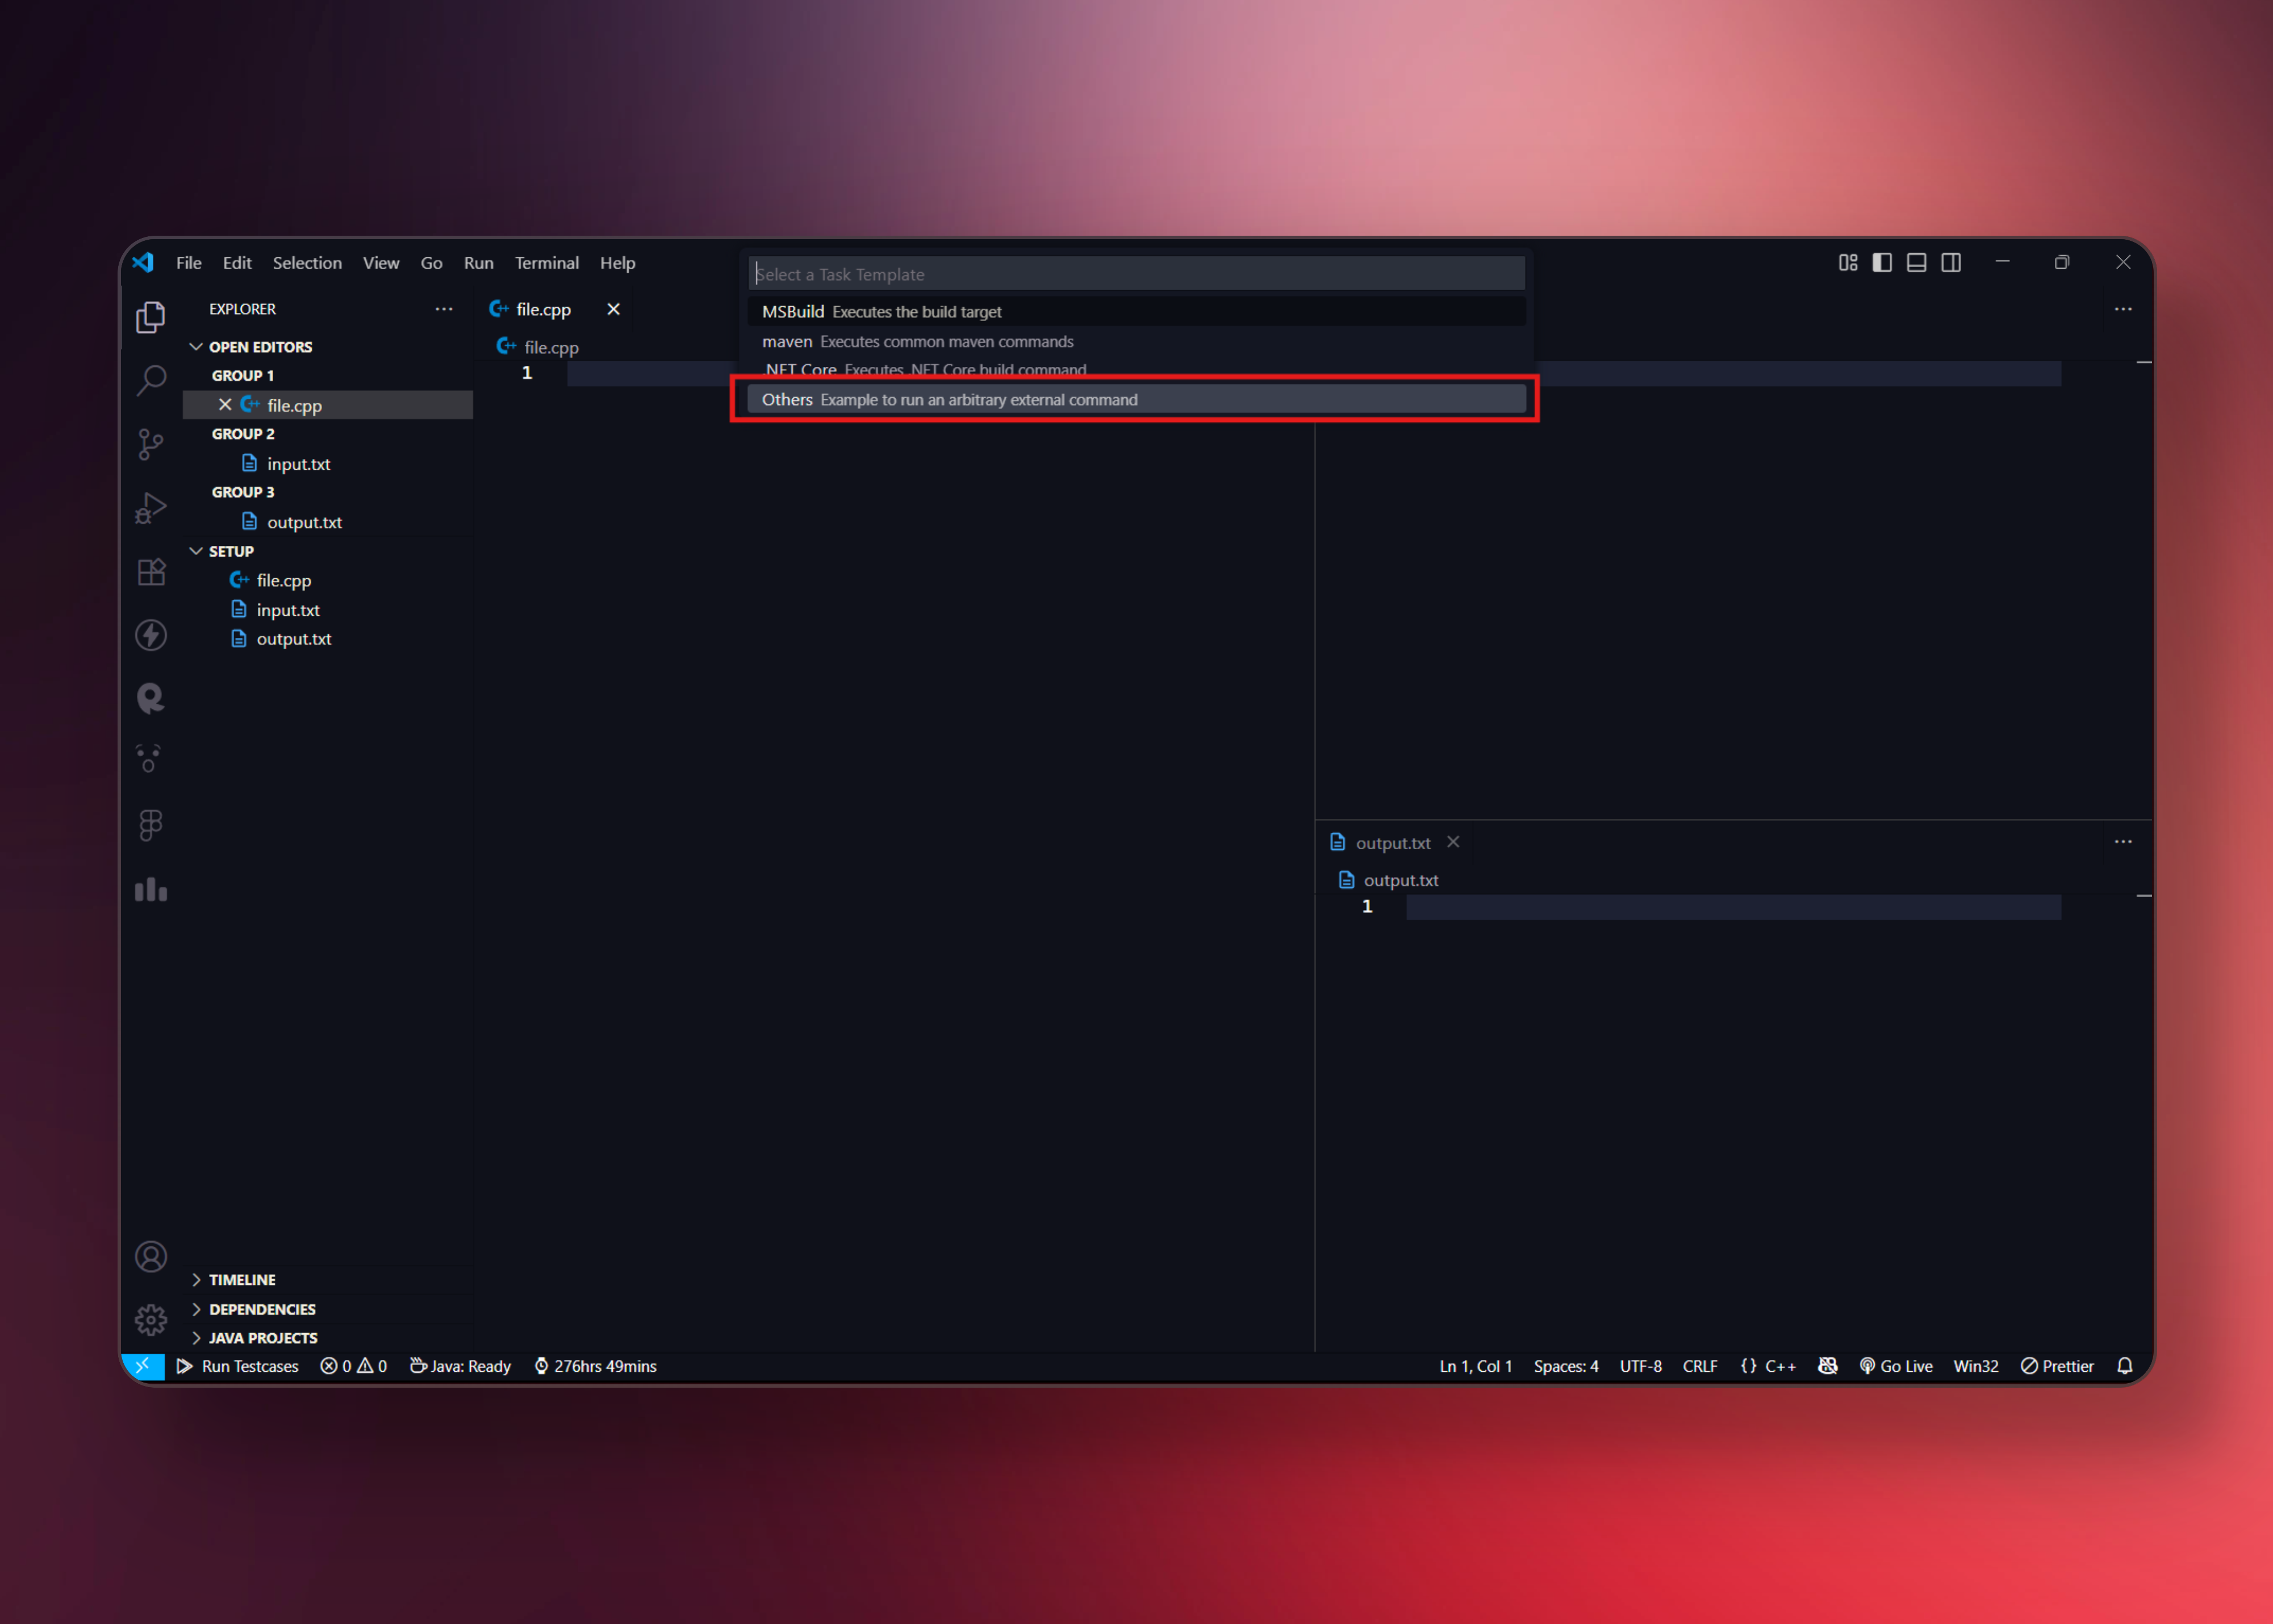
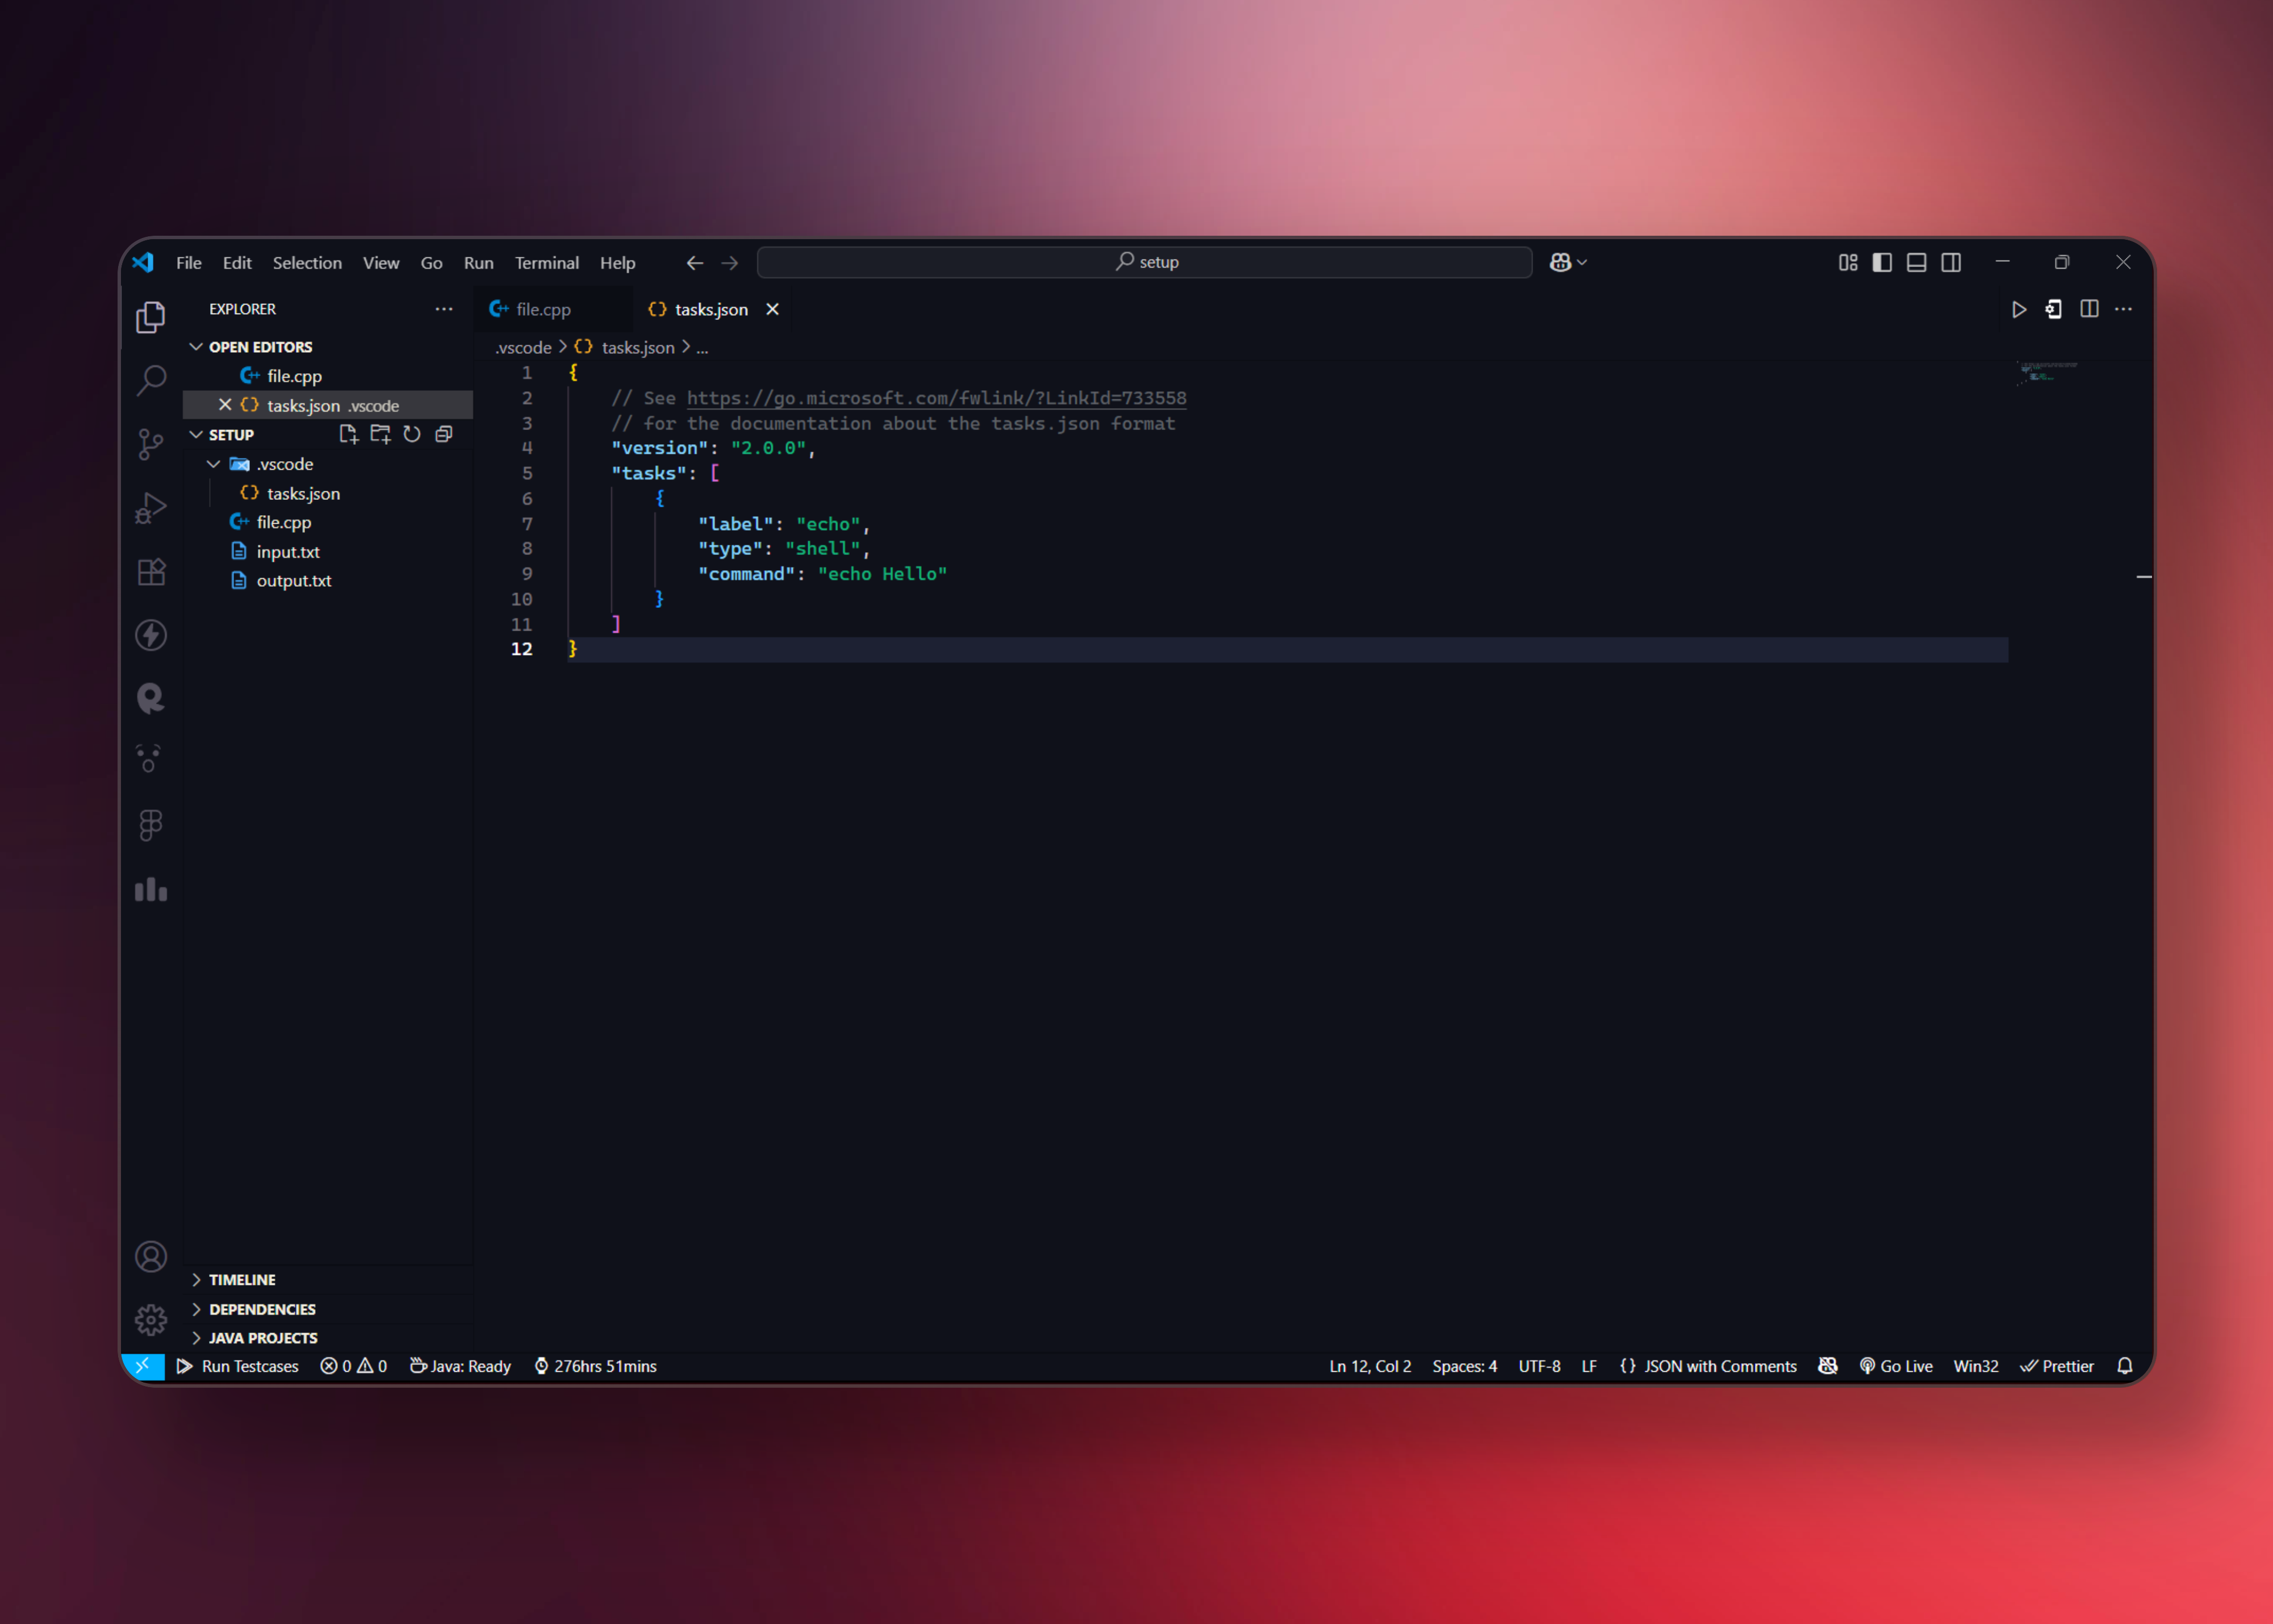
- Replace the content of
tasks.jsonwith:
For Only Mac Users:
{
    "version": "2.0.0",
    "tasks": [
        {
            "label": "compile",
            "type": "shell",
            "command": "g++",
            "args": [
                "-std=c++17",
                "-o",
                "${fileBasenameNoExtension}",
                "${file}"
            ],
            "group": {
                "kind": "build",
                "isDefault": false
            }
        },
        {
            "label": "compile and run",
            "type": "shell",
            "command": "g++ -std=c++17 -o ${fileBasenameNoExtension} ${file} && ./${fileBasenameNoExtension} < input.txt > output.txt",
            "group": {
                "kind": "build",
                "isDefault": true
            }
        }
    ]
}
For Windows Users
- Go to Terminal → Configure Tasks → Create tasks.json file from template → Others
- Replace the content of
tasks.jsonwith:
For Only Windows Users
Note: It will not work if your default terminal is PowerShell. Make it "cmd" then it will work.
To change default terminal: Hit Ctrl+Shift+P → write: "default terminal" → change it to cmd.
{
  "version": "2.0.0",
  "tasks": [
    {
      "label": "Compile and run",
      "type": "shell",
      "command": "",
      "args": [
        "copy",
        "\"${file}\"",
        "${workspaceFolder}\\jspwTest.cpp",
        "&&",
        "g++",
        "jspwTest.cpp",
        "-o",
        "jspwTest",
        "&&",
        "jspwTest",
        "<",
        "input.txt",
        ">",
        "output.txt",
        "&&",
        "del",
        "jspwTest.exe",
        "&&",
        "del",
        "jspwTest.cpp"
      ],
      "presentation": {
        "reveal": "never"
      },
      "group": {
        "kind": "build",
        "isDefault": true,
      },
      "problemMatcher": {
        "owner": "cpp",
        "fileLocation": [
          "relative",
          "${workspaceRoot}"
        ],
        "pattern": {
          "regexp": "^(.*):(\\d+):(\\d+):\\s+(warning|error):\\s+(.*)$",
          "file": 1,
          "line": 2,
          "column": 3,
          "severity": 4,
          "message": 5
        }
      }
    }
  ]
}
Important: The default terminal must be cmd, not PowerShell.
Change it via Ctrl+Shift+P → type "default terminal" → select "Command Prompt".5. Run Your Code
Now you're ready to start competitive programming efficiently!
Workflow:
- Write your C++ code in the
.cppfile - Provide input in
input.txt - Press:
- Cmd+Shift+B (Mac)
- Ctrl+Shift+B (Windows)
- The output will be automatically saved in
output.txt
Example workflow:
- Code in main.cpp:
#include <iostream>
using namespace std;

int main() {
    int a, b;
    cin >> a >> b;
    cout << a + b << endl;
    return 0;
}- Input in input.txt:
5 3- Output in output.txt:
86. Troubleshooting
Common issues and solutions:
- Compilation errors: Double-check your terminal is set to cmd (on Windows)
- Path issues: Ensure MinGW is properly added to your system PATH
- Permission errors: Run VS Code as administrator if needed
- Extension issues: Restart VS Code after installing extensions
For additional help:
- Consult online resources
- Use AI tools like ChatGPT or Claude for quick fixes
- Check the VS Code documentation for C++ development
Advanced Tips for Competitive Programming
Ready-made Code Snippets with BoilerKit Extension
For faster coding with pre-built templates and snippets, install the BoilerKit extension:
Steps:
- Open VS Code
- Go to Extensions (
Ctrl+Shift+X) - Search for BoilerKit
- Click "Install"
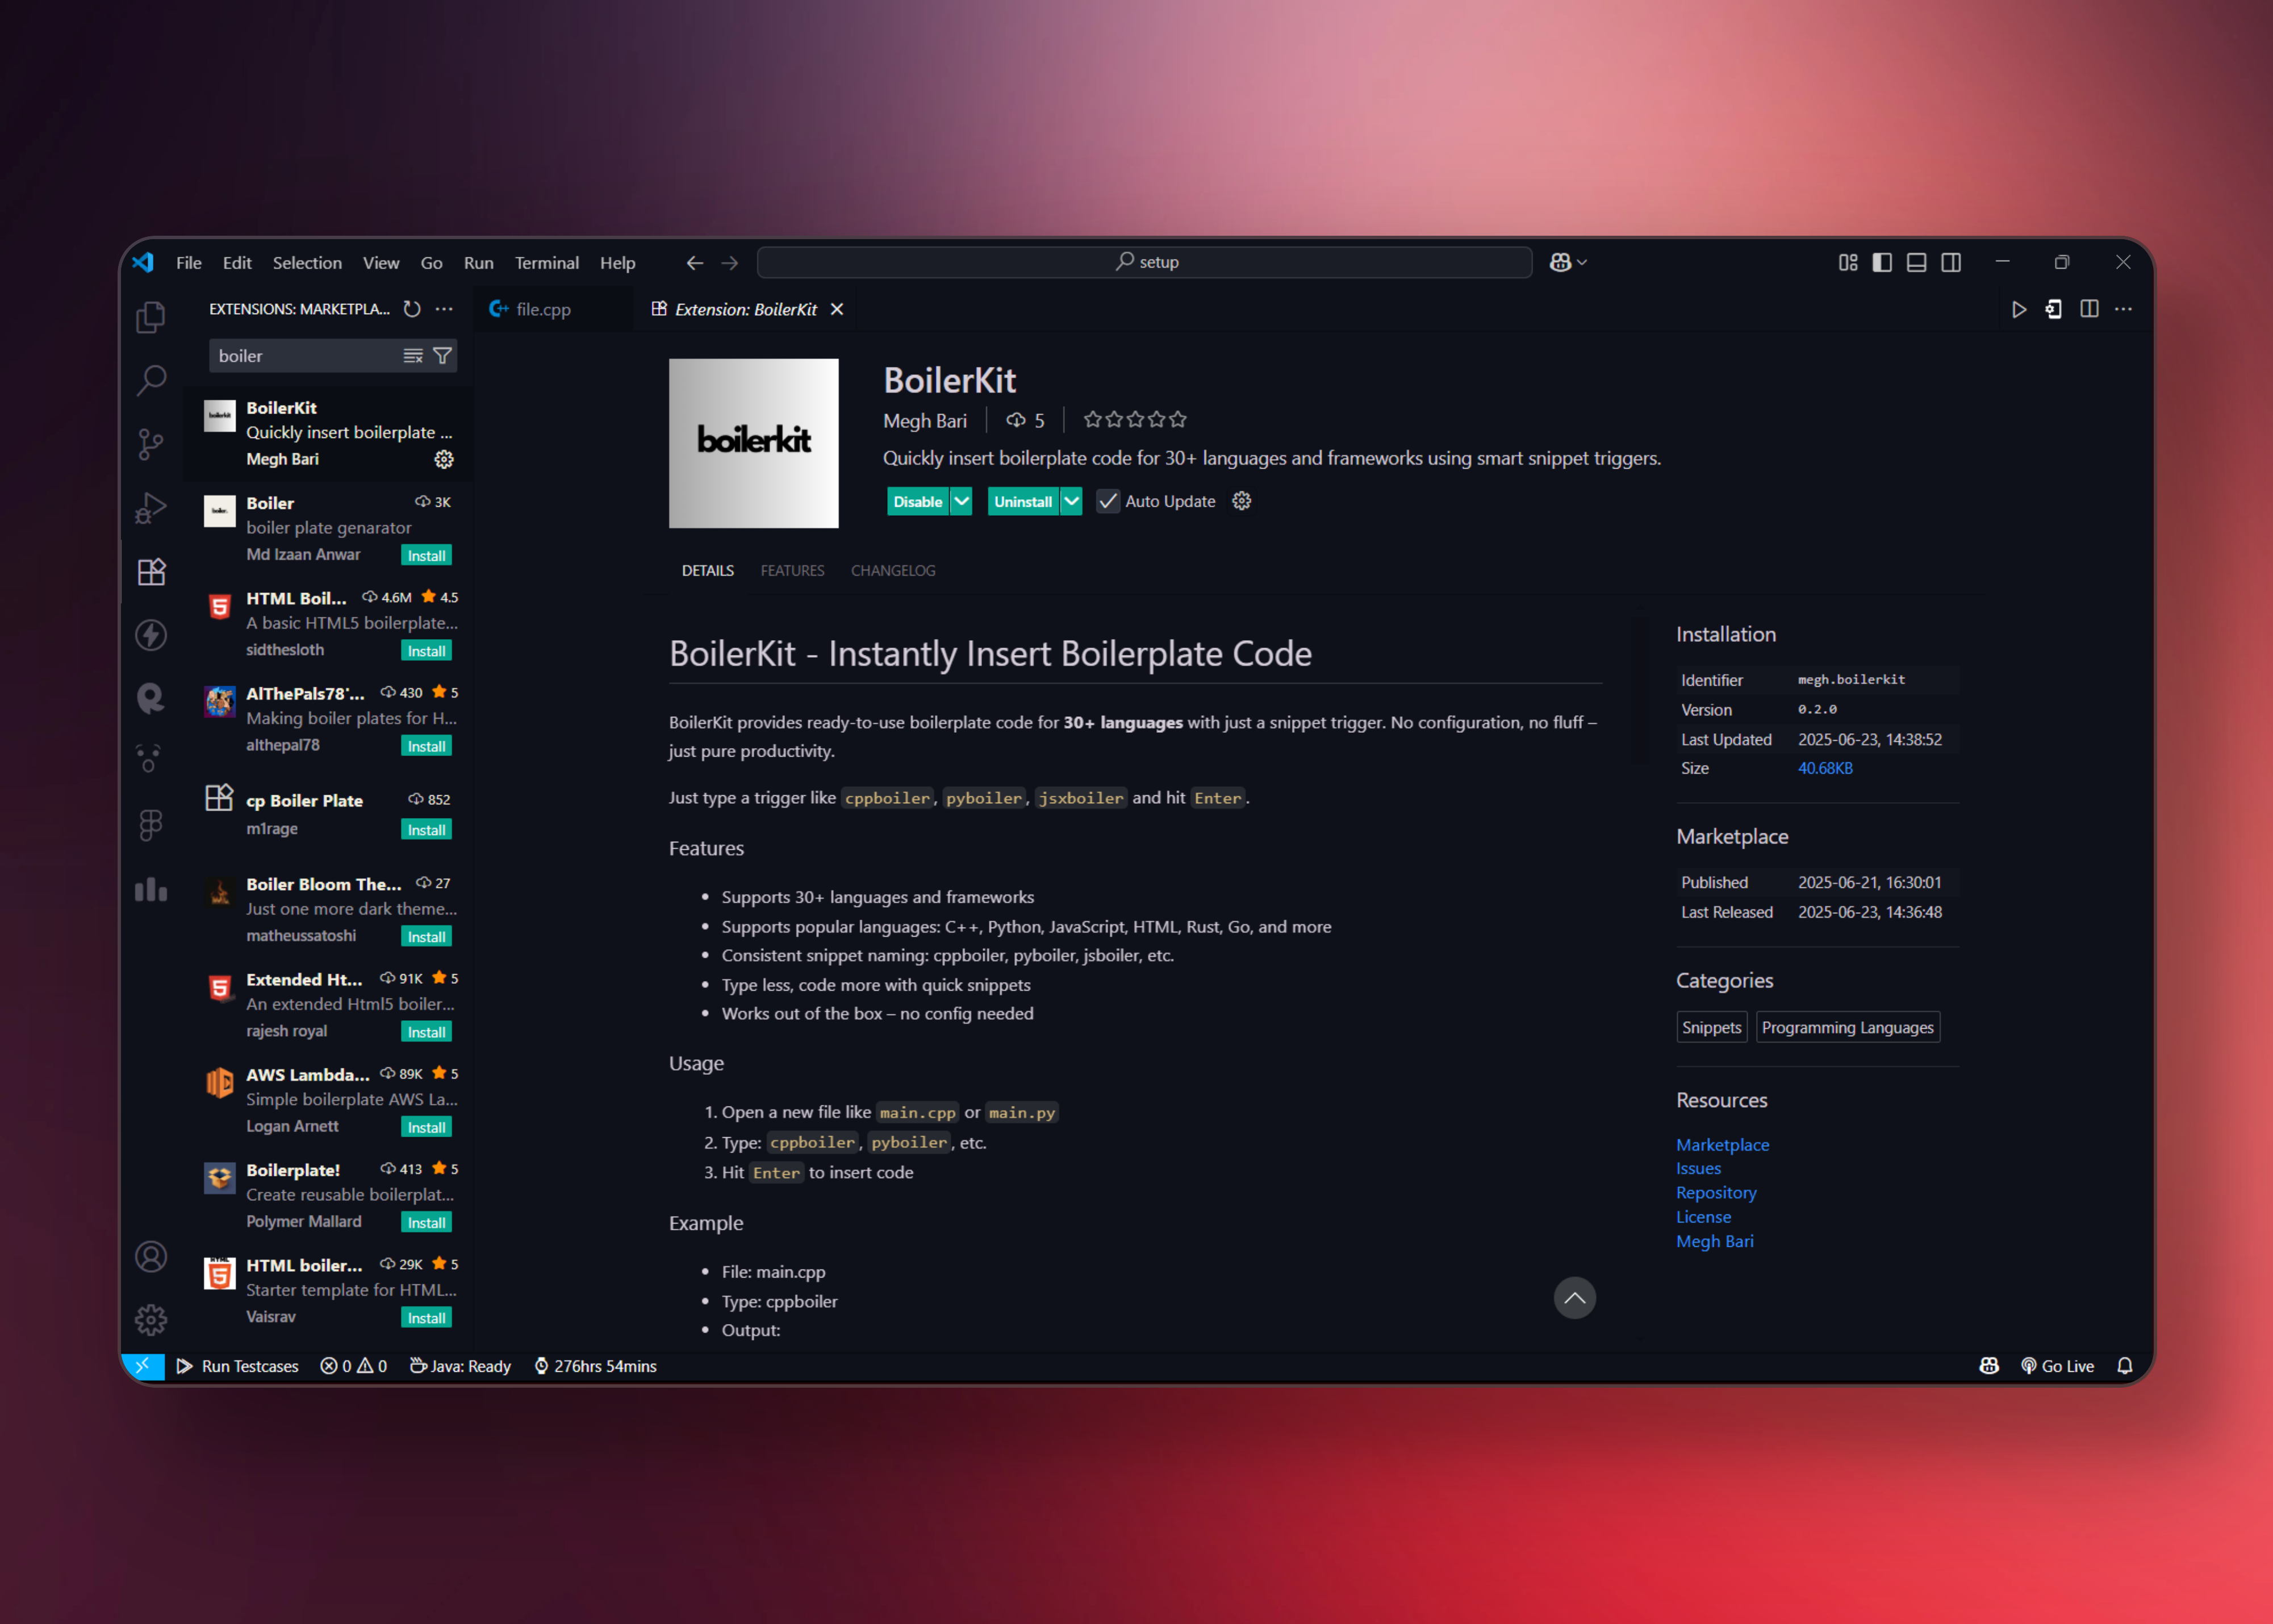
This extension provides:
- Supports 30+ languages and frameworks
- Supports popular languages: C++, Python, JavaScript, HTML, Rust, Go, and more
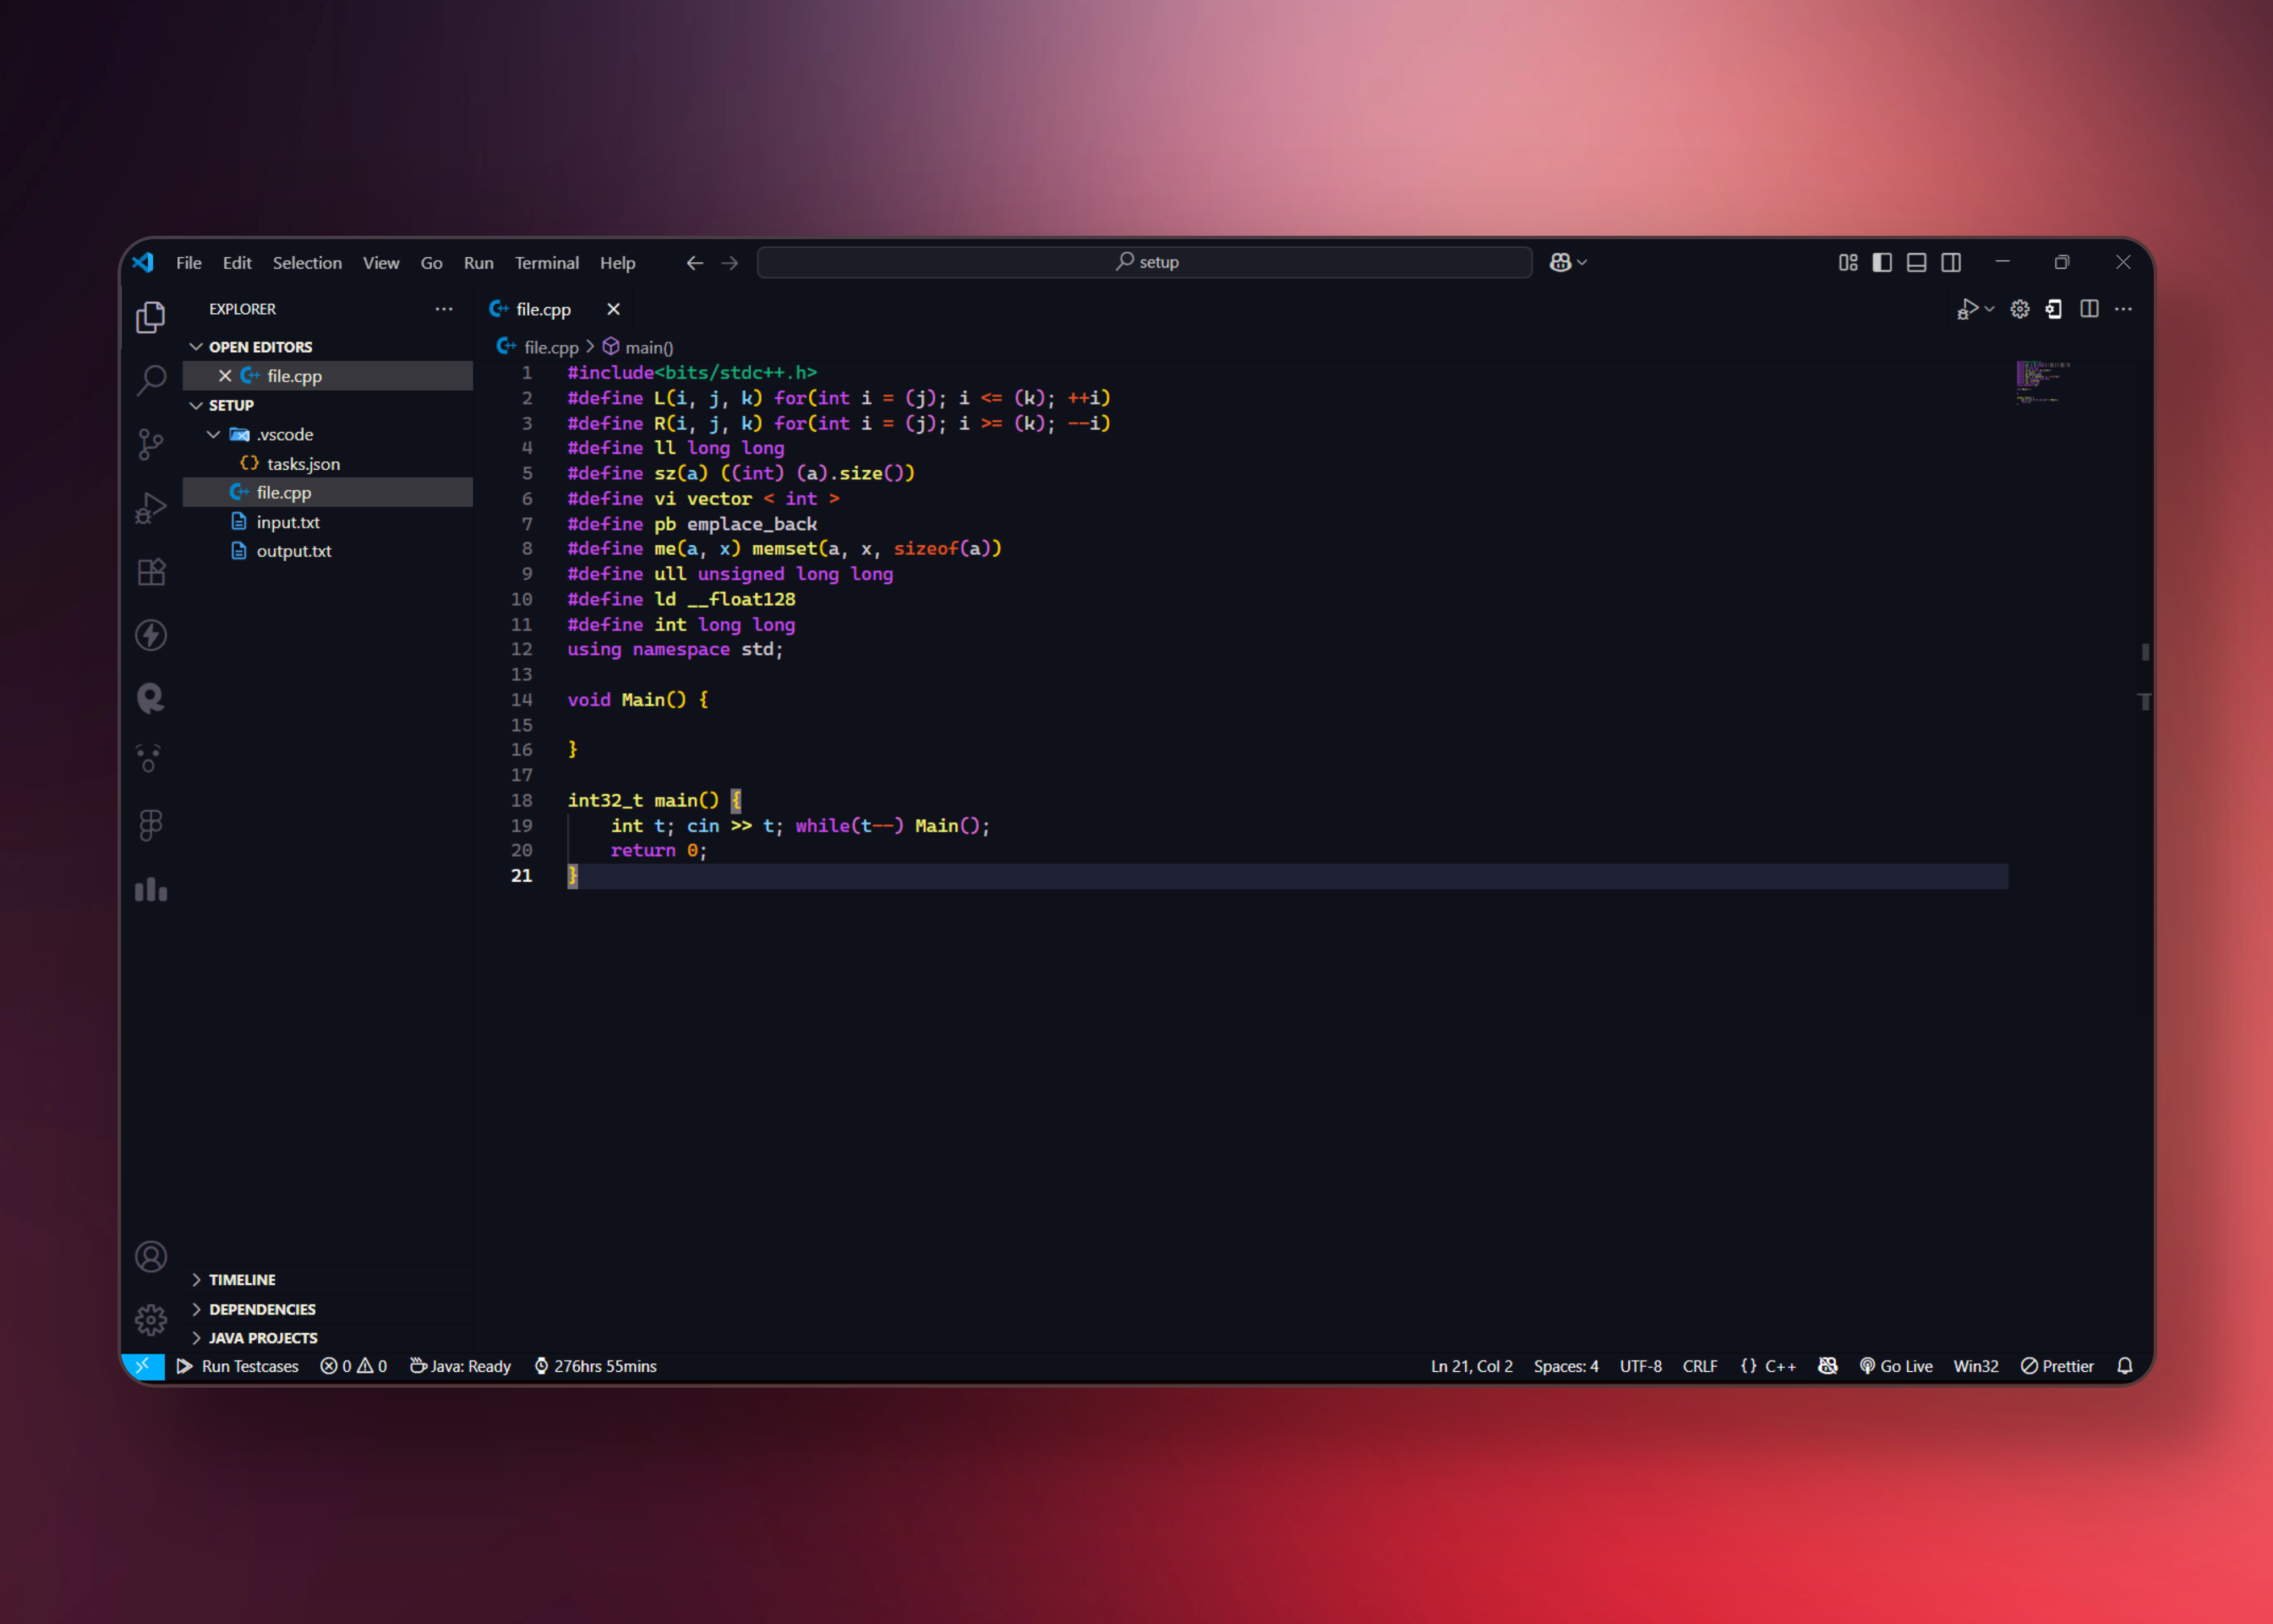
- Consistent snippet naming: cpboiler, cppboiler, pyboiler, jsboiler, etc.
- Type less, code more with quick snippets
- Works out of the box – no config needed
- Ready-to-use competitive programming boilerplates
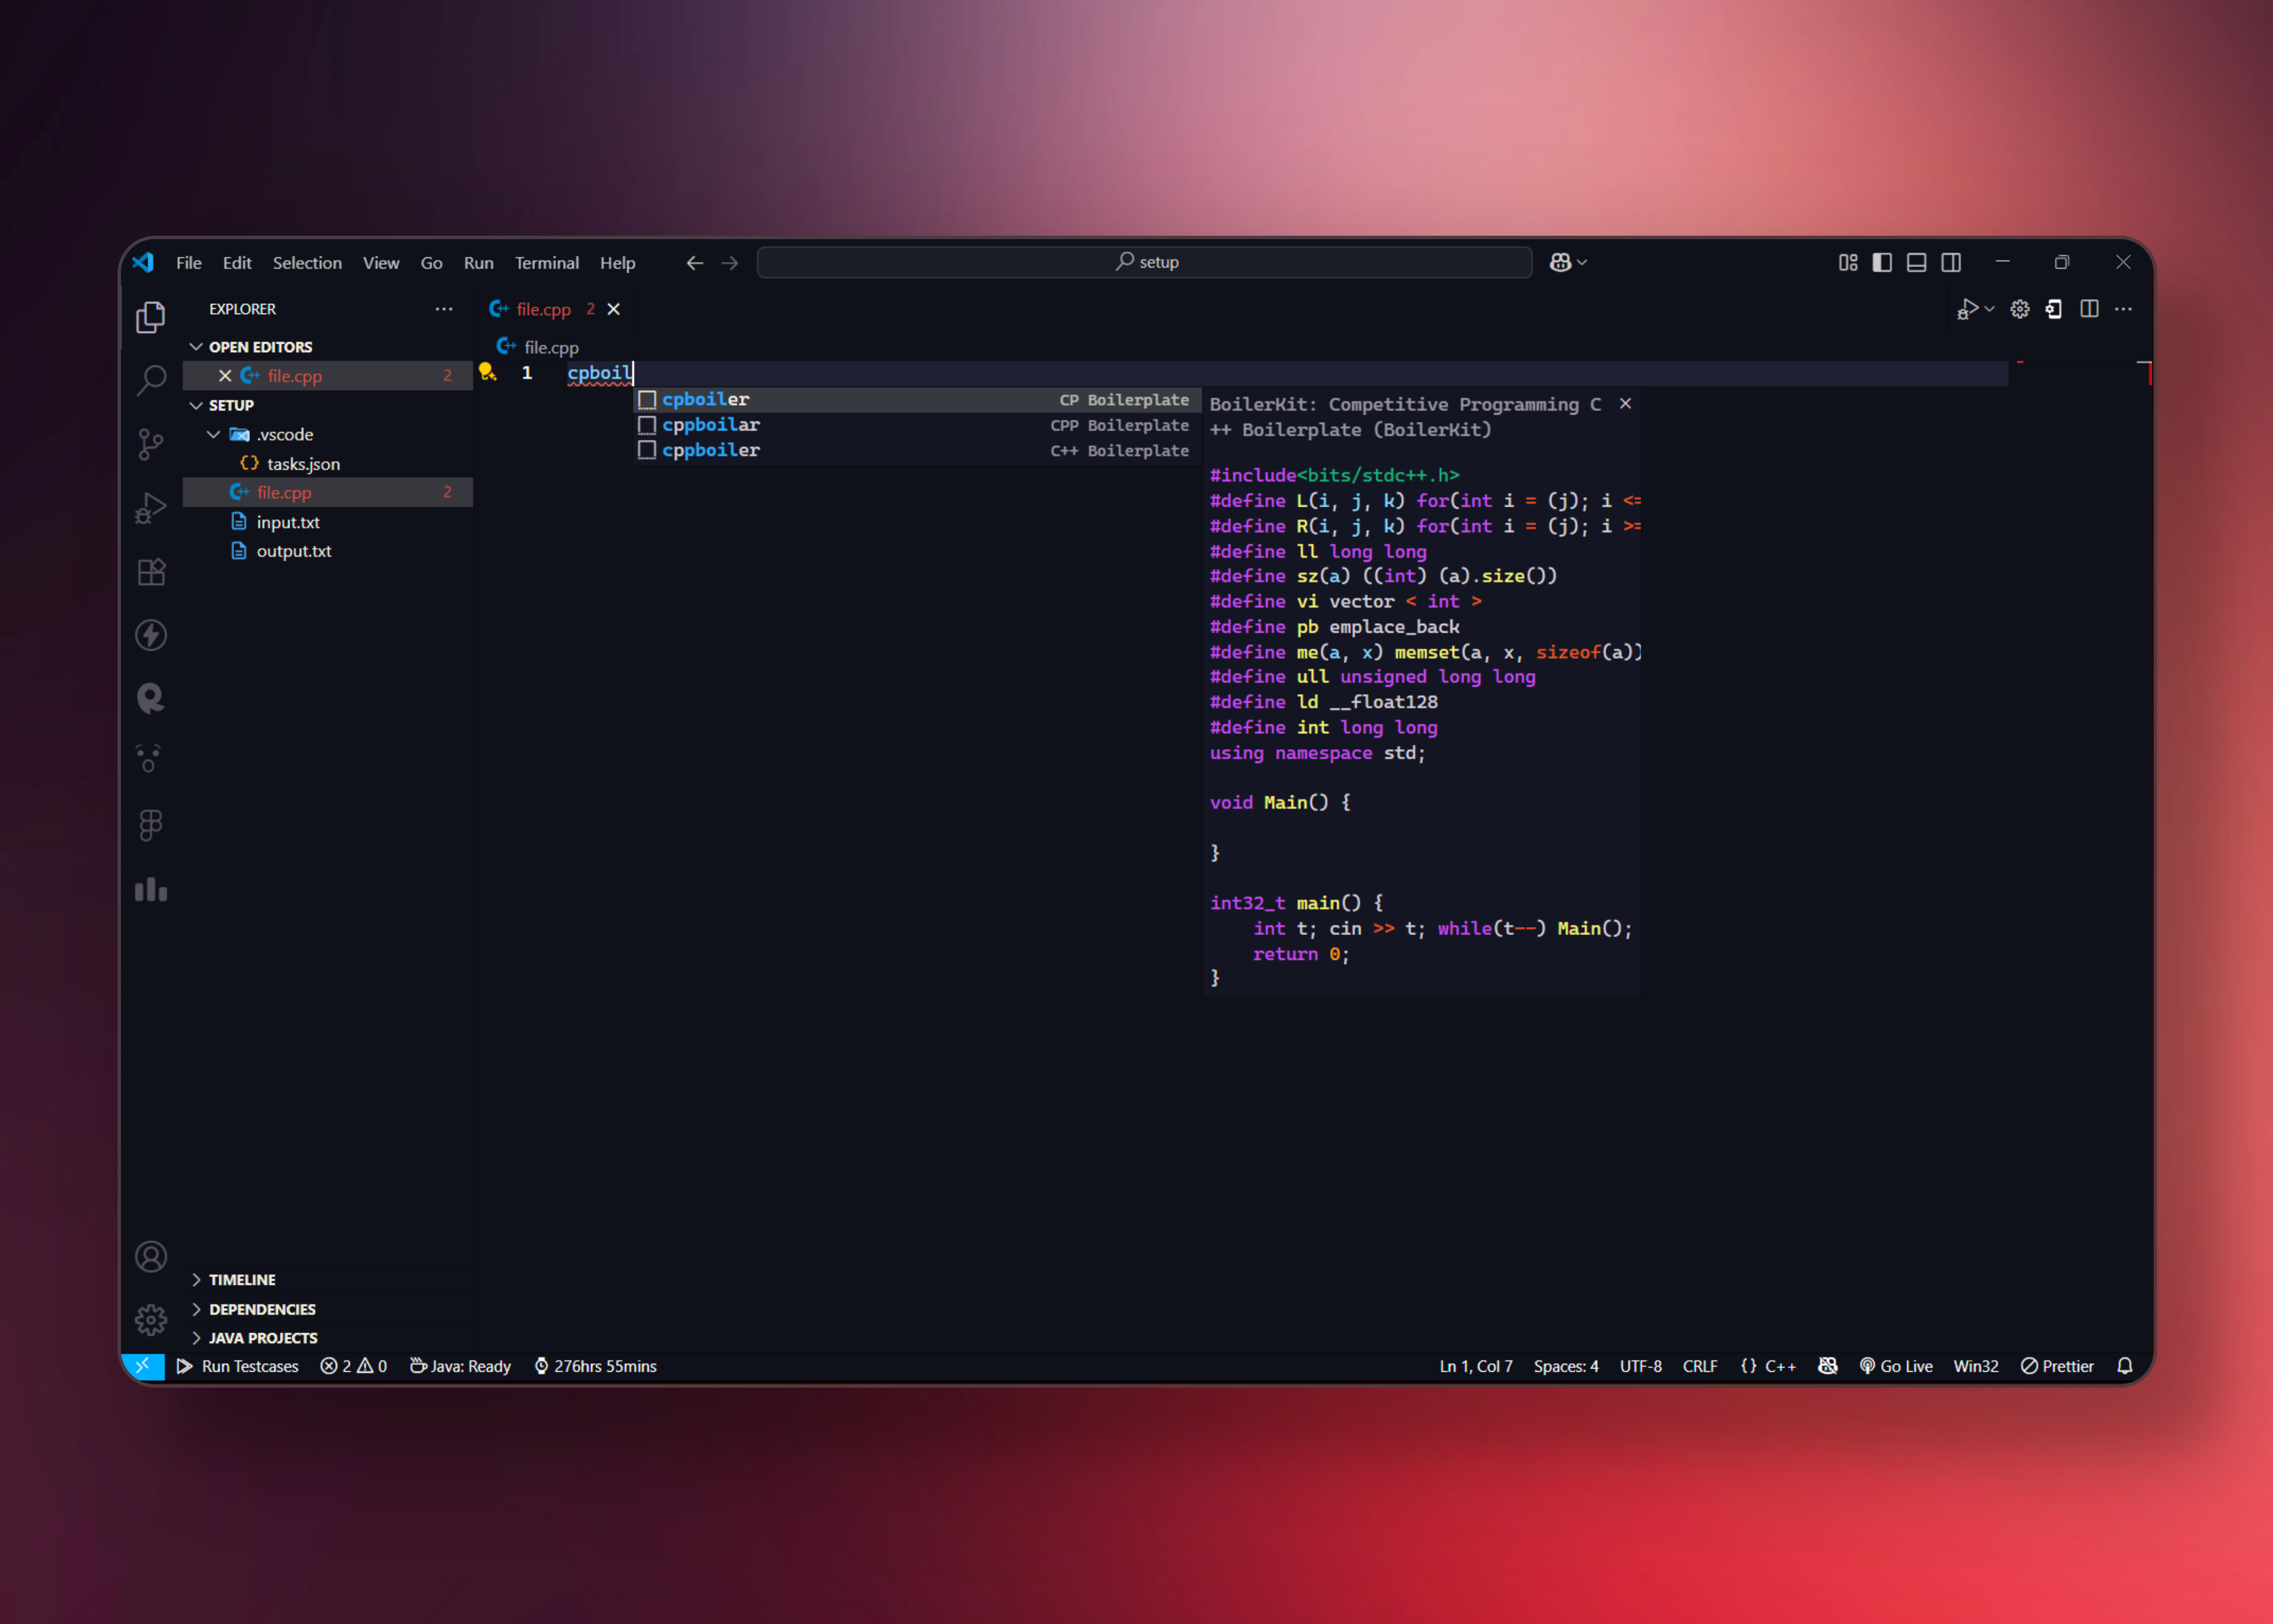
- Open a new file like main.cpp
- Type: cpboiler
- Hit Enter to insert code
Conclusion
With this setup, you can quickly write, test, and debug C++ programs for DSA and CP, all within VS Code. The automated input/output redirection saves valuable time during contests, and the organized layout keeps everything you need visible at once.
Key benefits of this setup:
- Speed: One-key compilation and execution
- Efficiency: Automatic input/output handling
- Organization: Clear separation of code, input, and output
- Professional: Industry-standard tools and practices
Happy coding, and may your solutions be bug-free and your execution times optimal!
- If you are using some other OS, you can use ChatGPT to get the equivalent command.
- Post writing a program in cpp press (cmd+shift+B) for Mac and (ctrl+shift+B) for Windows to run the code and get your the desired output. In case you are facing some issue, I recommend you to use Bard or ChatGPT to get your errors resolved.